Clear Your YouTube History: A Simple Guide for Fans!

Hey there, YouTube enthusiasts! We all love diving into the vast sea of videos that the platform offers—be it hilarious cat clips, mind-blowing DIY tutorials, or binge-worthy vlogs.‍ But let’s ⁣be real for​ a sec: our viewing⁣ history can sometimes start to resemble a chaotic junk drawer. Too many random videos, a few cringe-worthy moments you’d rather ⁤forget, and maybe some accidental deep dives into conspiracy theories you never intended to explore! If you’ve ever found yourself in that boat, you’re ​not alone. Clearing your YouTube history isn’t just about tidying up; it’s about reclaiming your viewing experience, hitting refresh, and making space‌ for all those shiny new videos ⁣you actually want to see. So, whether you’re doing a little spring cleaning on your account or just‌ looking to wipe ​the slate clean after a⁢ binge of questionable tastes, this simple guide is here to help you navigate the process with ease. Let’s get that​ history⁤ sorted out, shall we?
Understanding Why Clearing Your YouTube ⁢History Matters for Your Viewing Experience

Understanding ⁣Why ‍Clearing Your⁤ YouTube History Matters for Your Viewing Experience

Have you ever noticed that your‍ YouTube recommendations can‍ veer off into weird and wacky territory? ​Clearing your history can help reset that trajectory, giving you a ‌fresh slate to work with. Think about it: You might have watched a tutorial ​on knitting but then found⁢ yourself bombarded with cat videos for weeks. By ⁢wiping your watch history, you’re telling YouTube, “Hey, I ‍want⁤ to‌ see more ⁢of this ‍and less of ⁢that!” This not only‍ enhances your viewing experience but also allows the algorithm to tailor suggestions ⁣that truly resonate with what you enjoy. Plus,⁤ it’s a nifty way to keep your ⁤account from feeling cluttered with content you’ve long forgotten about.

Another underrated perk of clearing ⁤your history is⁢ the burst of privacy it offers. Did you know that every video you watch is logged and analyzed? While that sounds‌ kinda creepy, you can take ​charge by⁢ managing what the world sees — or in this case, what algorithms see. Regularly clearing your history helps maintain that boundary; after all, no one wants their friends to stumble upon a binge-watching session of cheesy rom-coms, right? ⁤So not only does it refine your recommendations, but ‍it also provides you with a sense of control over your digital footprint. Embrace the power of‌ a clean slate and watch how your YouTube experience transforms!

Step-by-Step Instructions to Clear Your YouTube History Effortlessly

Step-by-Step Instructions to Clear Your YouTube History Effortlessly

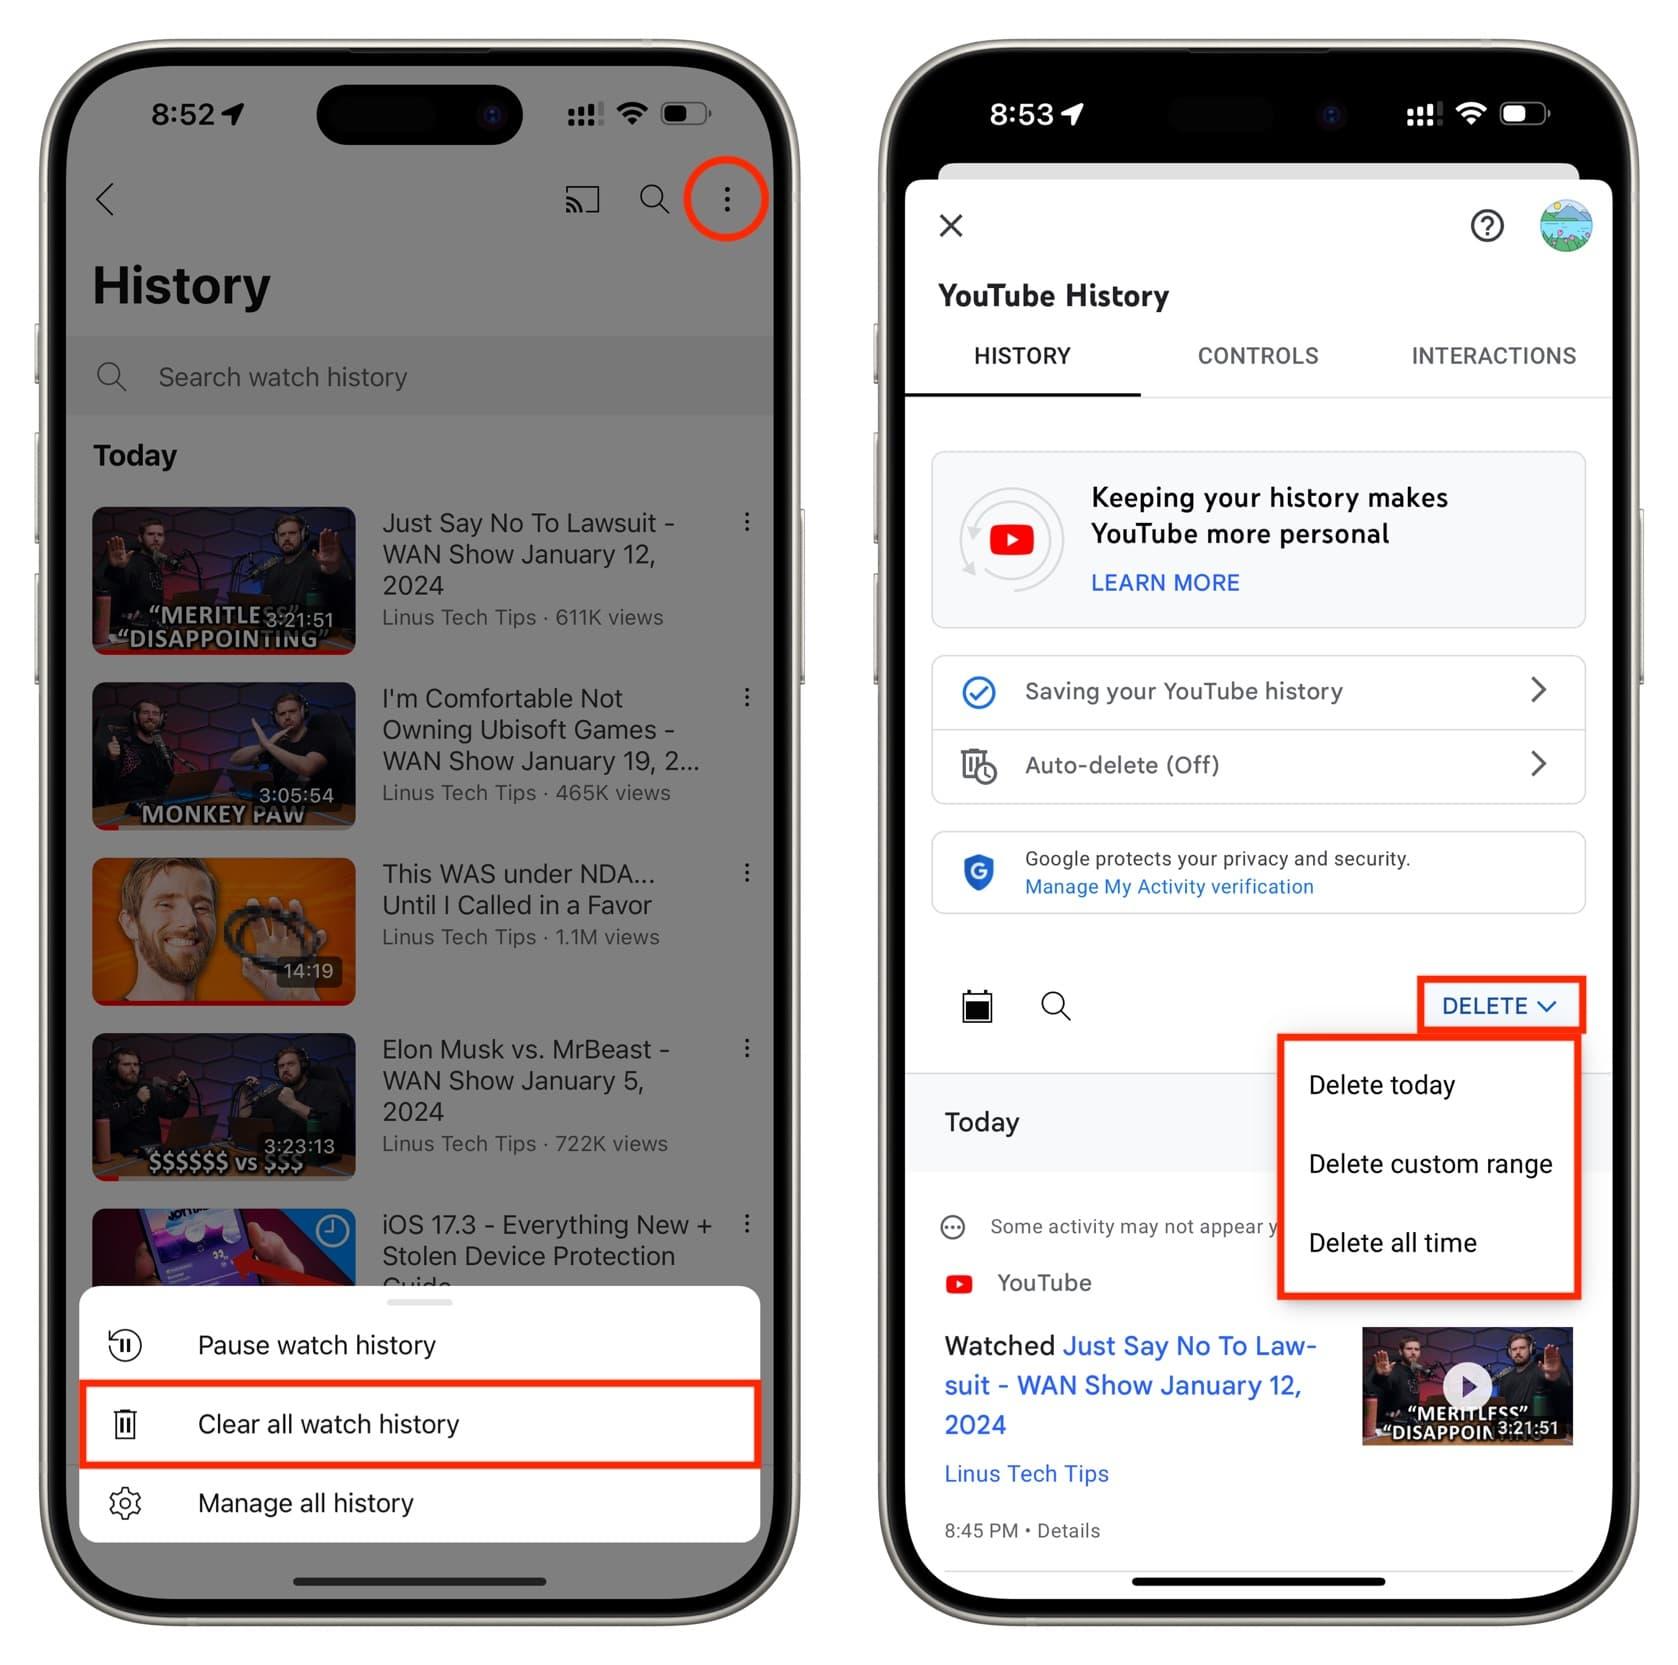
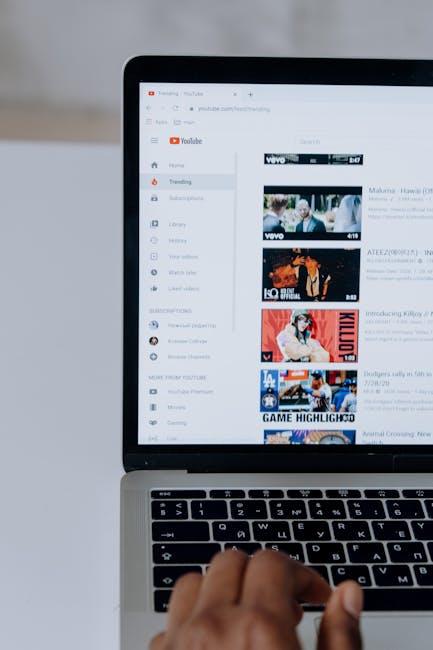
Ready to take control of your YouTube experience? Removing your watch history is ⁤a breeze! Here’s how to do it​ in ‍just a few clicks. Start⁣ by opening YouTube and heading to your profile icon in the ‍top right corner. Once you’re there, click on “Your data in YouTube.” ‌This section is your one-stop shop for everything related to⁢ your viewing habits. Now, look for ​a link that says “Manage your YouTube Watch History” and tap on ⁢it. It’s like⁣ opening a door⁤ to a secret room where you ⁢can start fresh!

From here, you’ll see your entire history laid out in ⁢front of you. ​If you want to clear everything out, find the “Clear all⁤ Watch History” button and give it a click—boom, it’s gone! If you’d rather pick and choose​ specific videos to remove, look for that handy list beneath. Simply hit the‍ three dots next to any video ‍and select “Remove ​from ⁣Watch ⁣History.” It’s like fumigating your YouTube space—keeping it clean and clutter-free!

Navigating Your​ Privacy Settings: Keeping Your YouTube Experience Personal

When it comes to ​enjoying YouTube, personalizing your experience is ‌key, ‍and one ⁢major aspect of that is managing your ⁤privacy settings. Think about it—who wants to scroll through a sea of random recommendations based‌ on⁤ a wild video spree from three months ago?‍ By adjusting your settings, you can keep your suggestions fresh ‍and relevant. Here’s how to take⁤ charge:

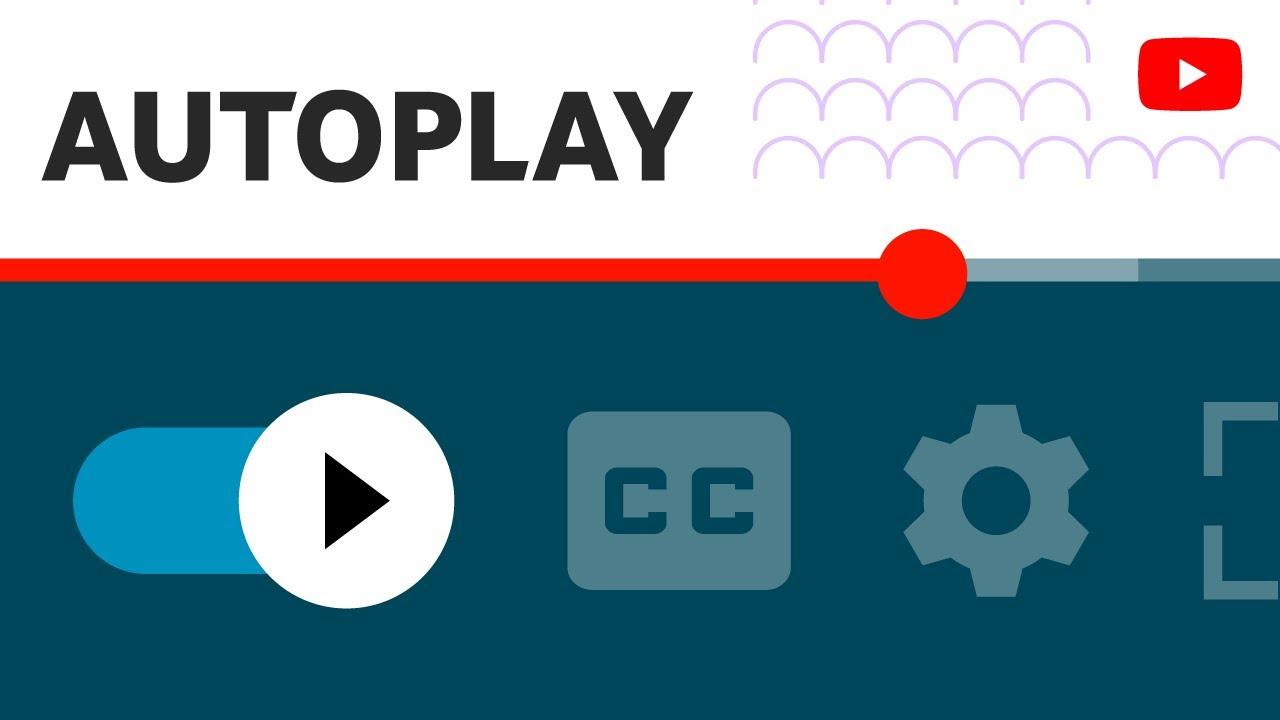
  • Clear watch history: This resets your video recommendations. No more bizarre algorithm suggestions popping up!
  • Manage search history: Delete‍ those past searches that linger in your records. It’s like giving your digital closet a good spring cleaning.
  • Turn off history tracking: Want to ‌keep things off the radar? Disable tracking so what you watch remains entirely your business.

Taking control doesn’t just enhance your experience; it also adds an ⁣extra layer of ‌comfort knowing your viewing habits ​are just for ‍you. Remember, YouTube’s privacy settings can either be your best friend or the bane of your existence, depending on how savvy you are ⁢at navigating them. So,⁣ dive in and tailor⁢ your settings for a YouTube journey that feels like it’s all about you:

Action Impact
Clear⁤ Watch ⁤History Refreshes recommendations
Manage Search History Removes unwanted searches
Turn Off ⁢Tracking Keeps habits private

Pro Tips for Managing Your YouTube Recommendations Like a Pro

Pro‍ Tips for Managing⁣ Your YouTube Recommendations Like a Pro

Managing​ your YouTube recommendations can feel like a game of whack-a-mole—just ⁣when you ‍think you’ve​ got it under control,⁢ another bizarre video suggestion pops up. So, what’s ‌the secret sauce? Start by ⁤actively curating your viewing history. Regularly clear out those unwanted videos that don’t resonate with your interests. Think of it like spring cleaning your closet; you wouldn’t keep clothes​ that no ‌longer fit, right? This keeps your‍ recommendations fresh and aligned with​ what you actually want to watch. Here are some​ pro tips you can implement:

  • Regular Check-Ins: Make it a habit ‌to review your watch history once a month. Remove any content ⁣that doesn’t reflect your current interests.
  • Use “Not Interested”: Whenever a random suggestion pops up, ⁢don’t​ be shy—click that “Not‍ Interested” button. You’re telling YouTube what you really don’t want to waste time on.
  • Take Advantage of Playlists: Organize your favorite⁣ channels or themes into playlists for easy access, minimizing the chance of rogue recommendations creeping into your feed.

Another key factor is understanding how YouTube’s algorithm works—think of it as a puzzle you’re trying to fit together. The platform relies heavily on your activity ​to shape future suggestions, so it’s crucial to actively engage with ‌the‍ content you‍ truly enjoy. Here’s a quick table to visualize how your actions​ can pivot the recommendations in your favor:

Action Effect ⁣on Recommendations
Watch relevant content Increases similar recommendations
Clear watch history Refreshes suggestions
Engage with your favorites Sends a signal⁣ for more ‍of the⁣ same

Wrapping Up

And there you have it,‍ folks!⁤ Clearing your YouTube history is as simple ​as ⁣pie, and ⁢now you’re armed ⁣with all the know-how you need to keep⁢ your recommendations fresh and tailored just ⁤for you. Think of it like spring cleaning for your digital life—satisfying, refreshing, and definitely worth the tiny bit of effort.

Whether you​ want to wipe away those late-night rabbit holes or ‍just keep things⁤ squeaky clean for the next binge session, ⁣you’ve got the tools and tips to navigate your viewing habits like a pro. So, why not take a minute right​ now and give that history a little scrub? Your future self will ‌thank you!

If you have‍ any questions ‍or more tips to share on managing your YouTube experience, feel free to drop a⁢ comment below. ⁤Until next time, happy watching and ​remember: it’s your YouTube world; you get to shape it however you ⁣like! 🎥✨

Unlocking YouTube: Easy Steps to Download Your Transcripts!

Ever found yourself engrossed in a⁤ YouTube video, captivated by the insights,‍ but wishing you ​could snag the transcript⁤ for later‌ reference? ⁣You’re not alone! Whether it’s a fascinating documentary, a riveting talk, ‌or a how-to​ guide, having that‌ transcript⁣ in hand can be a game changer.⁣ Imagine keeping the ‍pearls of wisdom without replaying the entire ⁤video. Well, you’re in⁢ luck! Unlocking your YouTube transcripts ⁤is⁤ easier than you might think. With⁤ just a‌ few simple steps, you’ll be able to grab those ‍transcripts and​ make your viewing experience even richer. Ready to dive in and discover how? Let’s get ‌started!

Exploring ‍the Benefits ​of Accessing YouTube⁤ Transcripts

Exploring the⁤ Benefits of Accessing YouTube Transcripts

Diving ⁤into the world of⁤ YouTube transcripts can ‍feel like striking gold,​ right? Imagine‍ being able to grab every ⁣little ⁣nuance from your favorite videos without having to hit rewind​ a million times.‌ YouTube ⁢transcripts not only offer a convenient way ⁣to digest content, but they also serve as a powerful learning tool. Think about it: whether you’re trying‌ to pick up a new ​skill, studying a‍ different language, or even⁣ juggling notes for work presentations, having that text‌ at your fingertips ‌can make life a breeze. Plus, it amplifies the ‌accessibility of the material, ensuring that everyone‍ can benefit⁤ from‌ the wealth of knowledge⁢ available, regardless of hearing ‍ability.

But wait, ⁣there’s more! Using transcripts boosts your productivity,⁤ turning that passive video-watching experience into an active⁢ learning adventure. This‌ method helps ⁢you to⁢ retain information ⁣better and even improves ‌comprehension. You can highlight key points, jot down ⁤ideas, and⁢ create outlines in a way that’s just not possible‍ when it’s all⁣ audio. To top it off, having a⁣ transcript opens⁢ opportunities for creating​ unique content. Just‌ think about⁣ how you ​could repurpose that video content into blog posts, infographics, or ​even ⁢a podcast ⁢script! Isn’t it exciting how a simple text can unlock so many possibilities?

The Ultimate Guide to Finding and Downloading Your Video Transcripts

The Ultimate Guide to Finding and Downloading Your ⁤Video Transcripts

Finding and downloading ​video transcripts can feel like searching for a needle in a ⁤haystack, but⁢ trust ⁢me, it’s ‍way more straightforward ⁤than it seems! First off, ‍for each YouTube‍ video that features closed captions, there’s a ⁣hidden ⁤gem just waiting​ for you. All you have to do ​is hit‌ the “More” button (you‍ know, those three little ‌dots to the right of the video ⁢player). ⁢A menu will pop up, showing⁢ an option labeled “Open transcript.” Click ‍on ‌it, and voilà! A panel will open on the right, displaying the transcript ‍synchronized with the video. It’s like‍ having your⁣ own ⁣little guide​ that keeps up with‌ the⁣ action. You can even⁢ scroll through and find specific moments by clicking on a timestamp!

Once⁤ you’ve got the transcript in view, you might be wondering​ how to snag it for⁢ later. ​No need ⁤to​ stress—just‍ highlight the text you want, right-click, and select “Copy.” Then, you can paste it into ⁣your favorite⁤ text‍ editor ​or ‍document. Easy peasy, right? If you’re ​after something more ‍organized, consider throwing⁤ those transcripts ⁢into a table. You ‌could use ​the following structure:

Video⁣ Title Duration Download⁢ Link
Fun with Cooking 15:32 Download Transcript
Traveling‍ the World 22:10 Download Transcript

By keeping everything neat and accessible like this, it’s as if you’ve created your own⁢ little library of ‍wisdom from ⁢the web!​ You can make notes, highlight key⁤ points, or⁤ even share them with friends. So go ahead, unlock the‍ resources at your fingertips and make those transcripts work for you!

Tools‍ and Techniques for a ​Streamlined Transcript Extraction Process

Tools and​ Techniques for a Streamlined Transcript Extraction ​Process

When it comes to pulling transcripts from YouTube videos,⁤ a variety⁢ of tools and techniques can make the process as smooth as butter. ⁤ Video downloaders like 4K ⁣Video Downloader and​ transcription services ⁤such as ⁤ Otter.ai can be your best friends. These platforms not only allow ⁤you to download the video but also give you options to⁤ extract the subtitles or transcripts seamlessly. And if you’re looking for free tools, check out DownSub, which lets you grab transcripts from ‌videos without ⁤breaking a sweat. Talk about a goldmine!

Once you have your transcripts,‍ the next step is to⁣ refine them. A great way to do this is by using ‍ text editing ⁤software like Google Docs or Microsoft Word, which ⁣comes packed with features for⁤ formatting and editing. Don’t forget to format your text for​ clarity—utilize ⁤bullet points for lists, or bold important sections ⁣to make the key points ⁤pop.​ Looking to collaborate‍ with others?⁢ These tools⁤ also allow for easy sharing ⁢and real-time collaboration, so you‍ and ⁢your team​ can work together ‍efficiently. Want to keep things organized? Consider creating a simple HTML ‌table​ to categorize your extracted transcripts.

Tool Description Best​ For
4K Video⁢ Downloader Download videos and​ subtitles Video enthusiasts
Otter.ai Automated live transcription Meetings and lectures
DownSub Simple subtitle extraction Quick and easy‌ access

Troubleshooting ‍Common Issues When Downloading Transcripts

Troubleshooting Common Issues When Downloading‍ Transcripts

Downloading transcripts from YouTube can ⁤sometimes feel like trying⁢ to ⁢navigate a maze⁣ with no exit signs. You click the ​button only to ⁤find ⁢nothing happens, or maybe the file is inaccessible. If⁤ you’re facing issues, ​start by checking ​your internet ⁣connection—sometimes ​a weak​ link can throw ⁤a wrench in‌ the‌ works. Also, ensure you’re logged⁤ in ​properly; glitches can occur if⁤ your session ‌is timed out or if there’s an error with your account. Clearing your ​browser ⁢cache is another quick trick that might do the magic. You’d‌ be amazed how often a little⁣ digital housekeeping can fix big problems.

If⁤ you’re still‌ hitting roadblocks,⁣ let’s⁢ check a few ‌more common culprits. First up, make sure the⁢ video actually has a⁢ transcript available—surprisingly, not every video does, even if you’d expect it. Also, consider trying​ a different browser or device; sometimes, compatibility issues arise for reasons we can’t even see. If you get an error message, jot it down; it can point you toward a more precise ⁤fix. Here’s a handy ​checklist to ‌keep in mind during your troubleshooting:

Issue Quick Fix
Video lacks transcript Check your video’s⁣ settings
No internet connection Reconnect‌ or switch networks
Browser issues Try a different browser ​or clear ‌cache
Account problems Log out and ‍log ⁤back in

Insights and ⁣Conclusions

And there you have it! Unlocking‌ YouTube transcripts‍ is⁤ a ⁣breeze, right? ⁢With ‌just a ​few simple steps, you can snag ⁤those ‌valuable transcripts and make ​your ⁢video viewing experience ⁤even richer.‍ Whether you want⁣ to turn‍ a lecture into notes, quote‌ your favorite‌ creators, or simply keep track of what you’ve watched,​ having those transcripts⁢ at ⁤your ‍fingertips ⁢is‍ a ⁣game changer.

Remember, it’s all about finding the right tools and not getting lost in the vastness ​of the internet. So,⁤ go ahead—give‌ it a ⁤try! Dive‌ in, explore, and make‌ the most of your YouTube journey. If you ​hit ‍any​ snags ⁣or have any awesome tips⁢ of your own, don’t hesitate to share. Happy downloading, and may your video-watching adventures⁣ be even more​ rewarding!

Looping Magic: Easy Ways to Repeat Your YouTube Videos!

Hey there, fellow YouTube enthusiasts! Have you ever found yourself⁤ utterly captivated by a ​video, wanting to ⁤watch that epic moment just one more time? Or maybe you’ve had a hilarious clip that’s just too good to let slip⁤ away into the ⁣abyss of ⁢your watch history? Well, you’re in luck! Today, we’re diving into the enchanting world of “Looping Magic.” This isn’t​ about tricking ⁤your⁢ audience or doing some sleight of hand; it’s all about simple, effective ways to repeat your favorite YouTube videos with ease. Whether you’re looking to savor that musical masterpiece, relive ​a jaw-dropping tutorial, or just enjoy the antics of ⁢your favorite content creator, we’ve got the tips ⁢and tricks to help you seamlessly‍ loop those videos. So grab your popcorn and settle in, because we’re about to make‌ your video-watching experience a​ whole lot more magical!
Unlocking ‍the Loop: Why You Should Consider Repeating Your Favorite Videos

Unlocking the Loop:​ Why You Should Consider Repeating Your Favorite⁤ Videos

Imagine diving back into your favorite moments ‌without skipping a beat. When you⁤ loop a YouTube video, you create a cozy little bubble where the magic plays on repeat. This kind of repetitive viewing isn’t just for ⁢catchy songs or ‍epic fails; it’s a way to soak up every ​detail and immerse yourself in content that resonates with you. Whether it’s a motivational ⁢speech, an ⁢instructional tutorial, or the⁢ latest dance trend, looping allows you to ⁣absorb information at your own pace.‌ Plus, it’s⁢ like hitting the​ refresh button on your mood—there’s something ​comforting in familiarity, right?

But wait, there’s more! Engaging with your favorite videos this way‌ can amplify your connection to the content. Think about it: when you loop‌ a standout scene, you’re not just passively watching; you’re actively engaging. To make the most out of​ this experience, consider experimenting ‍with different styles of content. Here are some ideas to get you started:

  • Motivational Speeches: Inspire yourself daily.
  • Tutorials: Master⁢ that skill you’ve been eyeing.
  • Music Videos: Enjoy the rhythm, let the vibes‍ flow.
  • Comedy Clips: Laugh your heart out, again and again!

By⁣ repeating these snippets, not only can you tap into ​the motivation⁤ and fun whenever you need it, but you can also experience layers of⁢ understanding that might have slipped by on the first watch. ⁤It’s like revisiting a great book or movie—you ⁣always seem to find something new!

Elevate Engagement: Techniques to Keep Your Viewers Coming ​Back⁣ for More

Elevate Engagement: Techniques to Keep Your‌ Viewers Coming Back for More

Keeping your viewers engaged is like hosting a party—the more fun you make it, the more likely they are to stick around!​ One⁣ surefire way to elevate that vibe is by creating ‌a sense of anticipation. Have you ever dropped a cliffhanger or posed an intriguing question at the end of your videos? This sparks curiosity and encourages viewers to ‍return for the answers. ‍Combine this with exclusive content—like behind-the-scenes clips or sneak peeks of upcoming⁤ videos—to create a loyal following ​that feels ⁤special. Don’t forget ⁢to sprinkle in interactive elements like polls or quizzes that invite your audience to ⁣participate. They’ll love coming back to share their ​thoughts and see how their input shapes ⁢your content!

A big part of maintaining that magic is consistency and community. Think ⁢of your channel as ‍a cozy café where viewers can gather regularly. Establish ‌a posting schedule ⁢that​ your audience can rely on, whether it’s weekly or bi-weekly. Consider using a themed series to keep your content fresh yet familiar—like “Tip⁣ Tuesdays” or “Fun Fact Fridays.” Pair that with a comments section that feels like a safe space for chat and⁣ feedback, and you’ve‌ crafted an inviting atmosphere that people want to be part of! Here’s a quick ⁢table to summarize some⁤ effective strategies:

Strategy Benefit
Cliffhangers Builds anticipation for the next video.
Exclusive Content Creates a sense of belonging and value.
Themed Series Offers structure and​ familiarity.
Consistent Posting Keeps viewers looking forward to⁢ your content.

Seamless Solutions: Simple Tools for Effortless Video Looping

Seamless Solutions: Simple Tools for Effortless Video Looping

There’s something mesmerizing about watching a video on repeat; it’s like finding that favorite song you just can’t get enough of! Whether you’re⁣ rewatching a tutorial, a music performance,⁢ or that funny clip your friend sent ⁤you, having the right tools to loop those videos​ can elevate your viewing⁢ experience. Here‍ are some simple‌ tools that make looping​ videos as effortless as ⁤a ⁤Sunday morning:

  • VLC Media ‌Player: This trusty media player isn’t just for ‌desktop use anymore; it comes with ​an easy-to-navigate‍ looping option. Just hit the loop⁣ button and voila ​- endless enjoyment!
  • Online Video Looper: Websites like Online Video Looper allow you to paste your YouTube link and set the start and end points for a ⁣custom loop.
  • YouTube Loop Button: Some browsers ​support a simple right-click option to loop videos ‍directly on YouTube. Just right-click the video, select “Loop,” and let⁤ the magic happen!

Want to get a little techy? Consider using ‍browser⁢ extensions designed for seamless video playback. These add-ons can⁤ transform your viewer experience by providing options that aren’t available right off the shelf. Check out this quick comparison of popular extensions:

Extension Features Pros Cons
Looper ⁣for YouTube One-click loop Super easy‌ to use Limited to YouTube
Enhancer for YouTube Custom playback speed and⁢ loop Feature-rich Can be overwhelming
Magic Actions for YouTube Auto-looping,​ cinema mode Great UI Ads may not be blocked

The Art⁣ of the Repeat: Crafting Unforgettable Content Through​ Looping Magic

The Art ⁣of the Repeat: Crafting Unforgettable Content Through Looping Magic

Ever stumbled upon a video that you just can’t get ⁣enough of? That’s the magic of repetition! When you loop your YouTube videos, you’re not just hitting replay; you’re crafting​ a mesmerizing experience for‍ your audience. Think about it – like a​ favorite song that gets stuck in ​your head, a well-looped video can draw viewers in, keeping them engaged and eager to watch⁣ again. The trick ​lies in understanding your content’s rhythm and timing. Is there a key moment that sparks interest? Build your loop around that. A catchy hook or ⁣stunning visuals ⁤can make people feel like they’ve entered a beautiful déjà vu, drawing them back⁤ time⁤ and time again.

Here are some simple techniques to weave that looping magic into your content:

  • Highlight Key Moments: Identify the most captivating sections of your video and loop them seamlessly to create that engaging flow.
  • Add⁤ a Catchy Soundtrack: Music can amplify the emotions of your video. A⁤ well-chosen track provides‍ a backdrop that invites viewers to immerse themselves again and again.
  • Use Visual Cues: Incorporate graphics or animations⁢ that signal the loop ending, making it feel intentional rather than accidental.

Loops can transform a casual ⁣view into a ‍sticky experience. They keep your content fresh, allowing viewers to notice something new with each play. Plus, the algorithm loves⁢ engagement. By​ encouraging viewers to stay longer or click the repeat⁣ button, you’re working‍ magic for your channel’s growth!

The Way Forward

And there you have it,⁣ folks! Looping magic isn’t just ⁣for wizards and wands—it’s easily within reach for all your‌ YouTube adventures. Imagine giving your favorite⁢ videos a second life, enticing ​viewers to stay a little longer ​and soak up all that goodness. Whether you’re looking to enhance engagement, create hypnotic playlists,⁢ or simply let those catchy tunes play on repeat, the tools and tricks we’ve discussed are your golden ticket.

So, next time you find yourself loving a video a bit too much, why not sprinkle some looping magic into it? It’s like hitting the replay button on your life’s greatest hits! No more scrolling, ⁢no more​ searching—just pure, uninterrupted joy in the form of looped content. Give it a whirl and watch how the engagement⁢ skyrockets.

Thanks for hanging out ​with me today! Don’t forget to share your newfound‍ looping skills with your friends. And who knows? Maybe your next viral sensation is just a loop away. Until next time, keep those videos rolling and enjoy the magic of repetition!

How to Effortlessly Block Annoying Copyright Owners on YouTube

Navigating YouTube⁣ can sometimes feel like walking⁤ through a⁣ landmine field,⁤ especially ⁢when⁤ you bump ⁣into those pesky copyright owners lurking at ⁢every turn. ​You’re just ⁢trying ‍to enjoy a chill evening streaming your favorite content, when suddenly ⁣you’re hit with a takedown‌ notice​ or ​a content claim⁤ that ‌ruins your vibe. ⁤Sound ⁢familiar? Don’t⁢ worry,​ you’re not alone in this digital jungle. Blocking those‍ annoying copyright claims ⁣doesn’t ⁣have ⁤to‍ be a Herculean feat. With a ⁢few ⁤simple⁤ tips and tricks, you can effortlessly sail past ‌this stumbling ‍block and get ‍back ⁤to what ⁣really ‍matters: awesome videos, creative content, and a stress-free viewing experience. So, grab‍ your ⁢popcorn, and let’s ⁤dive into some‌ foolproof⁢ strategies ⁢to reclaim your‌ YouTube bliss!
Navigating ​the⁣ YouTube​ Jungle:⁣ Identifying Copyright ‍Trolls in ⁤the Wild

When you’re ​cruising through the endless sea of videos⁢ on YouTube, the ‍last thing you‌ want is to find yourself tangled⁣ up with⁣ copyright⁢ trolls lurking in the shadows. Think ‍of these folks ‌as gatekeepers, just waiting for an⁢ opportunity to pounce‌ on unsuspecting creators. They thrive on rules and regulations and ​have a knack ‍for⁤ identifying any content they can claim‍ as⁣ their own. ​So, how⁣ can you steer ‌clear ​of these pitfalls? ⁢Start by⁣ identifying⁣ red ⁣flags that ⁤indicate ⁣a potential⁤ copyright issue:

  • Vague Claims: ​ If a channel⁢ has a ‍history of filing numerous claims with little explanation, be wary.
  • High Volume of⁣ Claims: Channels that flood ​strikes⁣ on various ‍videos ⁤often do so⁣ for profit, not protection.
  • Generic Content: If the channel primarily⁤ uploads stock music, ‍popular memes, or‌ compilations ‌without originality, they might just be‌ trolling.

Once you’ve⁢ spotted potential trolls,‌ there are ⁢paths to blocking their harassment. Use filter options to customize your YouTube experience, controlling who and what you⁢ see. You can also reach out directly⁢ to ​YouTube’s support; they‌ often have resources to⁤ protect against frivolous claims. On top ​of‌ that, having a keen⁢ eye for original ⁣content ⁢ can ​save you ​trouble. ‌To keep your ⁤creative juices flowing,⁤ consider ⁣this:

Creative‍ Tips Advice
Check Licensing Use ⁢royalty-free music ​or ‍visuals.
Collaborate Work with creators who⁤ respect copyright.
Stay Updated Always keep an eye on YouTube’s copyright​ policies.

Ultimately, it’s about ‍staying⁣ one step ahead. By knowing the⁤ signs ‍of these copyright trolls and equipping yourself with the right tools, you can navigate the YouTube jungle like a pro. Don’t let​ fear⁢ hold⁣ you back;⁤ forge ‌ahead with confidence ‍and keep ‌your channel thriving!

Crafting Your Defense: ⁢Essential​ Tools ⁢and Settings​ on ‌YouTube

Crafting Your Defense: Essential Tools ‍and Settings on YouTube

When ⁢it comes to maintaining your⁢ peace on ⁤YouTube,⁤ having the right tools is like carrying a‍ digital shield. Start by familiarizing⁣ yourself with YouTube’s Privacy Settings and Content ID System.⁣ These play a critical⁤ role in protecting your creative ⁢works ⁢and ensuring you don’t get ⁢pulled into the copyright storm.‍ Use the “Upload Defaults” feature to set restrictions on‍ your videos⁣ right from the start, allowing you to block certain users or channels with a history of copyright claims. ⁢This​ proactive⁣ approach ‍can save you heaps of headaches later. Also, make it a habit to ‍check your Dashboard regularly to ‌keep⁢ tabs⁢ on any copyright notices that‍ might sneak through.⁣ You ⁤wouldn’t ignore ‍an⁣ angry email from ex-multitudes, ⁣right?

Don’t⁣ forget​ to leverage⁤ the power⁤ of Appeals and Counter-Notices; think of them as your secret weapon ​in ⁤the realm of YouTube. ‌Knowing how to file‍ these can turn the⁣ tide​ in⁤ your favor. Here’s a quick summary of key steps:
⁤ ⁣

Step Action
1 Identify the ‌claim
2 Review the copyright
3 File​ a counter-notice ⁣if valid


⁣ ⁤ Knowing these‍ tools⁣ and settings​ puts ⁣you ​in the driver’s seat. It’s your channel, your rules – so‍ don’t let anyone rain on your⁣ creative⁤ parade.

The Art of ‌Digital Disengagement: How to ⁣Block and Report Effectively

The Art of⁣ Digital Disengagement: ‌How to Block and Report Effectively

Blocking and reporting annoying copyright⁢ claims on YouTube should be as easy as swiping⁤ left on a ‌bad ‌date. ​First things first, navigate ⁢to ‍the video that’s⁤ giving ⁣you trouble—maybe it’s that ‌overly zealous copyright⁣ owner who’s claiming your reaction​ video as their ​own. ‌Click ​on the ⁤three-dot menu beneath‌ the video, and choose ‘Report.’ This ⁣opens‌ up a dialogue, and you’re going to want‍ to select⁣ the option that‍ fits your situation best. Here’s​ a quick rundown ⁤of common ‍choices:

  • Copyright infringement: Use⁤ this if you believe your use of ​the content⁣ is ⁢fair and within ⁤the bounds of copyright law.
  • Spam or misleading: Choose this if it feels‌ like ⁣the⁣ copyright claim is ‌just a sneaky way of gaming the system.
  • Hateful content: Not applicable in most copyright cases, ⁢but remember—always keep ‌your channel a welcoming ⁣space.

After you’ve made⁣ your selection, YouTube⁣ will ask for ⁤more details—be⁣ as specific as you⁢ can. A concise⁤ yet informative submission will boost⁢ your chance of a​ favorable review.​ If ⁤you’re still feeling overwhelmed, taking⁢ a screenshot⁣ of your channel’s dashboard or the offending ⁢claim can serve as ‌supportive evidence. And⁣ remember, it’s all about taking⁢ control⁣ over your ‍own content; digital spaces can feel like wild jungles, but‌ with a​ few‍ effective blocking⁢ and‌ reporting tactics, you can ‍carve‍ out a peaceful path!

Staying⁣ Sane in the Copyright Maze: ​Tips⁤ for Maintaining ⁤Your ‍Creative Flow

Let’s face it; navigating the world of copyright on YouTube can feel like wandering through a ​maze ⁣full of traps. To ‌keep your ⁤creative juices flowing and avoid the frustration of copyright ⁢claims, ‌it’s essential to equip yourself with a few strategies.‍ First off, choose royalty-free‌ or Creative Commons music. This‍ allows you⁤ to‌ set the mood for your videos ‌without the worry of copyright⁣ strikes looming over your head.​ Websites like​ Bensound ⁣ or Jamendo are ​treasure troves‍ for this type of content. Just remember, some ⁣licenses‍ may require attribution, so be sure to read the fine print before ⁤hitting​ publish!

Secondly, utilize ​YouTube’s⁤ audio library—it’s a hidden gem! Trust‌ me, spending​ some time there can save you countless hours of dealing with copyright disputes. You can‌ filter tracks by mood,‍ genre, or ​even duration. ​Another way​ to dodge ⁤copyright‌ headaches ​is by collaborating with other creators—you help each ⁢other out, and ‍get fresh ⁢ideas flowing! Just keep communication open, clarify ownership of your collaborative ⁢pieces, and you’ll⁤ stay in the safe zone.⁤ Remember, staying ahead of these⁤ hurdles not only preserves your sanity but also lets your ⁢creativity ⁣shine through without interruption!

To Conclude

And there ⁢you‌ have it! Blocking ‌those pesky copyright owners on YouTube doesn’t have to feel​ like ‌a digital tug-of-war. With a little finesse and the right​ tools, you ‍can enjoy your⁣ favorite content, ‌free from interruptions and frustrations. ‌Remember, it’s ⁢all about curating your experience and keeping your creative juices flowing without⁣ the constant fear of copyright claims ​looming over your head.

As you navigate⁣ the⁢ colorful maze of YouTube,‍ let these⁢ strategies empower ‍you to ‍take charge of your ⁤viewing habits and make ⁢the platform work for you.‍ So​ go ahead,⁣ dive back into the endless sea of videos,​ and don’t let anyone dim your vibe. Happy watching, and ‌may your feed be forever free of unwanted copyright ⁢drama!

Mastering YouTube: A Simple Guide to Blocking Channels!

Are‍ you tired of scrolling ‍through ‌your YouTube feed ⁤only to stumble upon channels that just don’t⁢ vibe with you? Maybe it’s that endless stream of ⁤prank videos or tutorials that simply don’t hit the‍ mark⁢ for you.⁢ We’ve all been there—wishing we could just wave a magic wand and ‍make those unwanted distractions⁤ disappear. Well, guess what? You can! In this⁤ guide, we’re diving ‌into the ins and outs of blocking channels on YouTube.‌ Whether you’re looking to clear the clutter or just sharpen your viewing experience, we’ll⁢ walk you through a simple and effective process. So, grab a snack, get comfy, and let’s unlock the secrets ‍to mastering your YouTube⁤ experience like a pro!

Understanding the Why ⁤Behind Blocking Channels on YouTube

Understanding the Why Behind Blocking Channels on YouTube

When it ⁢comes to managing your YouTube experience, understanding the reasons behind why you might want to block certain channels can⁤ make all the difference. ‌Imagine⁢ you’re⁣ at a party, and there’s⁤ that ‌one person ‌who just won’t stop talking about their conspiracy ⁣theories—annoying, right? Just like that, some channels can be‌ a ⁣real drag, flooding your feed with content that just‌ doesn’t resonate​ with you. By blocking those creators, you reclaim⁣ your space, ensuring that your recommendations are tailored to your taste and interests. This is all about curating⁢ a community that enhances your enjoyment, not detracts ⁢from it. Think of it as creating your personal ⁢bubble⁢ of positivity in an otherwise chaotic digital world!

Moreover, blocking channels is not just‍ about ‌personal preference; it’s ⁢also about fostering a healthy online environment. When ‌unwanted content‌ clogs up your feed,‌ it can skew⁣ your perception​ and lead ⁣to frustration. By​ taking control⁢ and ⁢blocking certain channels, you actively contribute to a more⁣ enjoyable viewing experience, not just for yourself ‌but potentially for others too. Imagine ‍your YouTube feed as a beautiful garden that you tend to⁣ regularly. If‌ the weeds—aka, ⁤those channels you⁤ don’t want to see—are pulled out, vibrant flowers‍ (content you actually love) have ‍more room to‍ grow. It’s a ⁣simple yet powerful ​way‍ to curate the content that‍ truly inspires and entertains you.

Step-by-Step Guide to⁤ Bouncing Unwanted Channels

Step-by-Step Guide to Bouncing Unwanted Channels

Ready to ⁣kick those‍ annoying channels ​to the⁣ curb? ⁤First, you need ⁢to navigate to the ⁤channel you want to block. Go‌ ahead and find that ⁤pesky channel, whether it’s in your subscriptions ​or in⁤ the‌ comments section of⁣ a‌ video. ⁤Once you’re there, ‍click on the channel name to access their profile. Now, look ​for the “About” section—this is like the heart of their channel.‌ Here,​ you’ll see a ⁣little gear icon (⚙️) lurking ⁣about. Give that a click, and you’ll find the magical option to ‍block⁢ the channel. It’s⁤ like hitting the “do not disturb” button on your TV remote!

Now that you’ve blocked the channel, let’s make ⁢sure you won’t⁣ be ​bothered by them again.⁤ You can head over to your settings by clicking on‍ your profile icon in the top right corner. From there, navigate to⁢ the “Settings” menu, and then hit “Community.” Here’s⁢ where the real fun happens! Under the “Hidden ⁤users” section, you can ⁢manage everything. ⁤Just type in the channel name you’ve blocked, and voila, it’s added ‍to your list of hidden users.‍ No more unwanted comments or notifications! You’re the master of ‌your YouTube universe, ‌and now you⁣ can⁣ enjoy watching your‍ favorite content without distractions.

Customizing Your‌ Viewing Experience with Channel Restrictions

Customizing Your Viewing Experience with⁣ Channel Restrictions

When it ​comes to shaping your YouTube experience, channel restrictions can ⁢be a game-changer. Imagine ⁤trying to navigate through a forest,‍ only to be bombarded by⁤ thorns and ​branches in your way. ​That’s what unwanted channels can feel‌ like on your feed! With just ⁣a few clicks, you can streamline your viewing experience by blocking channels that don’t suit your taste. By doing this, you’ll not‍ only⁣ reduce ⁣the‌ noise but⁤ also fill ⁤your ‍recommendations with content that genuinely piques your interest. So, if ⁢you’re tired of sifting through irrelevant videos, it’s high time to take​ control!

To make the most of your customizations, consider these easy tips: Identify channels you⁣ want to block, whether they’re⁤ overly commercial or not aligned with your⁢ interests.⁤ Take⁤ advantage of the settings ‌menu—it’s your trusty compass in this journey! Also, don’t forget to regularly update your preferences as your‌ tastes change over time. ​It’s just like rearranging your furniture to‍ make your‍ living space feel fresh and inviting! By personalizing and​ limiting⁤ what you see, you can transform your YouTube⁣ experience ‍into a more ‍enjoyable and tailored adventure.

Keeping⁣ Your YouTube ​Feed Clean and Enjoyable

Keeping Your YouTube⁤ Feed⁣ Clean and Enjoyable

Having ‍a clutter-free YouTube ‌feed can transform your viewing experience ‍from chaotic to curated.‌ Imagine ⁤walking into‌ a clean, organized room; it just feels more inviting, right? By taking control of the channels you​ choose to follow, you can create a space where every click‌ is something‍ you’re genuinely excited ⁣about. ⁣YouTube gives you the power to personalize your feed⁣ with just a few simple steps. Start by⁢ regularly reviewing your subscriptions ⁣and ask yourself: Does this channel still bring me⁢ joy? If⁣ not, don’t hesitate to take ⁤action. Unsubscribing is as easy as pie and‍ can dramatically ⁣clean up that ​feed! ‍Don’t forget that you can also utilize‌ YouTube’s “Not Interested” option on​ videos that pop ​up from channels you’d rather avoid; ‍it’s like giving your feed a ‍gentle nudge in the‌ right ⁣direction.

But that’s ​just ⁤scratching the​ surface! There’s ​so⁣ much more you can do to keep your⁣ YouTube experience⁣ enjoyable. Here are some fun strategies to enhance​ your feed:

  • Create Playlists: Organize your ‍favorite⁢ videos​ or channels into playlists⁤ that cater to your‍ mood or the time you have available.
  • Use Restricted Mode: If there are certain types of content you find unappealing, ‌activate restricted mode to ⁤filter them out.
  • Explore ⁤New Channels: ‍ Don’t be afraid to venture into different content genres! Sometimes the unexpected can lead⁣ to your new ⁤favorite.

In the grand scheme of things, a⁢ properly managed YouTube feed can feel like a comfy couch to sink​ into ⁤at ⁢the end of a long day—so ⁤why not‌ make it as ‌cozy​ as possible?

Future Outlook

And there you have it, folks! Mastering YouTube ‍isn’t just about⁤ creating killer ⁢content; it’s also about ⁣curating your viewing‌ experience. Blocking those ⁣pesky channels that just don’t vibe with what you’re ​into can ​make your‌ YouTube journey​ a whole lot smoother. Remember, it’s‍ your⁢ space—like rearranging your‌ living ⁣room to ⁢make it feel more “you.” Whether it’s incessant clickbait, repetitive​ noise, or just content that doesn’t spark‌ joy, you’ve got ‌the ⁤tools to keep ⁣your feed fresh and enjoyable.

So, go ahead and take charge!‌ Now that you know how ⁤to block channels, it’s time to dive back into the content that truly ‍captivates ⁣you. ⁣And hey, if you run ‍into any challenges⁢ or find some new⁤ features,⁣ don’t hesitate to share your experiences. We’re all⁢ learning together in ‍this wonderful world‌ of YouTube! Happy viewing, and may your ⁤recommendations be ‍ever in your favor! 🎥✨

Clearing the Slate: How to Nix Your YouTube History

Ever felt like your⁢ YouTube recommendations are a little too… personal? Maybe you’ve accidentally ‌wandered into questionable video territory, or‌ perhaps you just want to start fresh⁣ without ⁢the algorithm judging ⁣your late-night rabbit ⁤holes. Whatever the ​reason, you’re not alone! Clearing your⁤ YouTube history is⁢ like hitting the reset button on your viewing habits. Imagine it as spring cleaning for your digital life—a chance to wipe the⁢ slate clean and let the platform suggest new gems ​that truly fit your vibe. So, if you’re ready to kick⁣ those cringe-worthy choices ⁤to the curb and reclaim your‍ video-watching ‌experience,⁣ let’s dive into the simple‌ steps to nix ‌that YouTube history for good!

Understanding Your YouTube History ‍and Its Impact on Recommendations

Your YouTube viewing history isn’t just a record of the random videos you’ve watched; it ⁤shapes the very recommendations ⁣that ​pop up on your feed. Every quirky cat video or late-night conspiracy theory you’ve indulged in ⁤sends little‍ signals to the YouTube algorithm, whispering, “This is what they like!” It’s kind of like your history⁣ is⁣ a playlist that tells YouTube what to serve you⁣ next. However, sometimes that playlist can get‍ a little ​messy, filled with things ⁣you’ve ⁤outgrown ⁢or simply don’t want to see⁤ again. Imagine walking into your favorite restaurant, but instead​ of your favorite dishes,⁣ they’re just serving ‍you leftovers you didn’t want—time to hit the reset ​button!

Navigating your⁤ YouTube history gives you the power to curate what⁣ entertains you. You can decide to embrace the⁤ quirky‍ gems you love while‍ bidding farewell to those⁤ regretful binge sessions. ​Here’s how your​ actions impact what‌ YouTube thinks you want:

  • Watch Time: Longer views on ‍certain genres signal⁣ YouTube to promote similar content.
  • Search Queries: What you ​type in searches ⁤contributes heavily to the kind of videos that flood your recommendations.
  • Engagement: Likes, shares, and comments? Yep, they all factor into ⁢how ⁤the algorithm reads your preferences.

By taking control of your history, you ​refresh those pesky ⁢suggestions and pave the way for content that genuinely interests ⁢you. ⁢Think of‌ it like decluttering your closet; there’s no point in keeping that sweater you’ll ​never wear again, right?

Understanding Your YouTube ‌History ‌and Its Impact on⁢ Recommendations

Step-by-Step Guide to Deleting Your Watch and Search History

Ready to wipe⁢ the ‍slate clean? Deleting your Watch⁣ and Search History on YouTube is‍ as easy‌ as​ pie. First,‍ head⁤ over to the YouTube website ⁤or app. Look for your profile picture in the ⁣top ⁣right corner—give it a click. A dropdown menu will pop⁣ up like that ‌surprise party you ‍didn’t see coming. From ⁤there,⁢ select Settings. You’ll find a treasure chest of options, but we want to focus on Privacy right now. Under this section, you’ll see‍ a magical ‌option‍ labeled Clear Watch History. Confirm your​ choice, and just like that, ‍your ⁢previously watched​ videos vanish into thin air!

Now, ‍let’s ⁤tackle‍ that​ Search History. Still in the Settings menu, shimmy over ⁤to ‌ History & privacy. Here, you’ll spot the Clear Search⁤ History button—click ‍it like you mean it. You ⁣might even feel a sense of⁤ release,​ like tossing⁤ a heavy ⁤backpack ⁤off‍ your shoulders after a hike! For an added layer of privacy, consider ⁤toggling on the option for⁢ Pause search ‌history. This way, your future searches won’t clutter your history like leftover snacks in a drawer. ⁤Just​ remember, ‍once it’s‌ cleared, it’s gone. ⁤So, think of it as a ‌fresh start, like ⁤spring cleaning ⁣for your digital life!

Step-by-Step Guide to Deleting Your Watch and Search History

Exploring Privacy Settings to Manage Your YouTube Footprint

When ‍you dive into the world of ‌YouTube, it’s⁣ like stepping into a massive library where the shelves are crammed⁢ with endless content just waiting to be explored. But what ⁢if you want to⁢ tidy up the digital trails​ you leave⁤ behind? Thankfully, YouTube offers​ robust privacy settings that⁢ let you manage your‍ viewing history. Start by heading over to Your⁢ Data in YouTube under ⁤the account ⁣settings. Here, you can easily pause the collection of your watch ⁤history. Imagine it like putting on blinders while you ride⁤ a horse through⁤ a busy street; ‍this‍ way, you can enjoy the ride without⁣ the distractions of what’s around you—your data remains clutter-free.

But if you’re eager to wipe the slate completely clean, deleting past ⁣activities is a breeze. Navigate to the Manage Your History section, and you’ll find options to clear specific ⁢videos or even clear all history in one fell swoop. It’s as refreshing as spring cleaning your closet—out with the old and⁣ in with the new! Not ⁤sure ⁤what to delete? Consider creating a custom playlist for your all-time favorites so you don’t feel like you’re losing‍ anything special. Here’s a handy checklist to help you maximize your privacy settings:

  • Pause Watch History:⁤ Stop YouTube from chilling on⁤ your every​ viewing whim.
  • Clear Watch ⁤History: Sweep your ​past views to ​make way for new discoveries.
  • Create Playlists: Keep your favorites ⁢while scrubbing everything else.
  • Check ​Activity‌ Status: Regularly review what’s stored to keep control ⁣of ​your digital footprint.

Exploring Privacy Settings to Manage Your YouTube Footprint

Tips for Maintaining a Fresh Start and Curating ‍Your Viewing Experience

Keeping your digital space fresh is​ like ⁢cleaning out a⁢ crowded closet; it makes ⁢everything easier to find and way more enjoyable to use. Start by diving into‌ your YouTube‍ history—thought about‌ how much clutter is hidden there? You ⁤might be surprised at the rabbit holes you’ve⁣ wandered down! ⁢Take a​ moment to think about your viewing‍ habits and clear out videos‍ you no ‌longer want to ⁢see. Just head to your Library, ⁤tap⁢ on‌ History, and ⁢start trimming the fat. Pro ​tip: make this a weekly habit to keep things ⁤organized.

Once you’ve given your history the ‍ol’ heave-ho, consider ​curating ⁤your⁤ suggestions to match ‍your current interests. You know,⁤ like planting a garden that reflects the season. Follow channels that ​inspire you ​ or resonate with your hobbies, and unsubscribing from⁢ those that don’t spark joy can help‌ breathe new life into ⁣your ‌feed. Think ⁣about creating specific playlists—like a mixtape for ⁢your eyes! This way, you can ⁣effortlessly navigate⁤ between tutorials, vlogs, or entertainment, making your‌ viewing experience ​as⁣ delightful as curling up with a good ‌book.

Tips for Maintaining a Fresh Start and Curating Your Viewing Experience

In⁢ Retrospect

And there you have it—clearing your ‍YouTube history is as easy‍ as pie! You’ve got the tools now to wipe that slate​ clean, whether you’re ​looking⁤ to refresh those recommendations or just‌ keep your viewing habits private. Think of ​it like decluttering your ⁤digital space; a⁣ little ⁢housekeeping goes a long way in making ‌your ‌YouTube experience way more⁤ enjoyable.⁣ So go ahead, take charge of ‍your history like a boss, and let those videos ⁤flow in a way‌ that reflects your true vibe. ⁤If you have any more tips⁤ or tricks up your sleeve, drop them in the comments! ⁤Until⁢ next time, ‍happy streaming! ‍🎥✨

Unlocking YouTube’s Secrets: How to Find Unlisted Videos

Hey there, fellow YouTube explorers! 🎥 If you’ve ever found yourself lost in the vast ocean of video content on YouTube, you’re not alone. From cat videos to DIY tutorials and everything in between, YouTube is a‌ treasure trove for⁤ the curious-minded. But wait, have you ever ​stumbled ⁣upon the concept of unlisted videos? These ‍hidden⁢ gems are like secret passages in a sprawling mansion, waiting just for the right guest to unlock them. So,​ what ​exactly are unlisted videos, and how can you uncover the treasures that lie ​within them? In this article, we’re going to dive deep into the world of YouTube’s unlisted content, revealing tips and tricks to help​ you⁣ navigate the shadows of this popular platform.⁤ Buckle up, because whether you’re hunting for exclusive⁢ content from your favorite creators or⁣ just curious about what’s lurking behind the curtain, we’re here to help you unlock ⁢all those secrets and discover uncharted territories of YouTube! 🌟
Unlocking YouTube's Secrets: How‌ to Find Unlisted Videos

Exploring the Hidden Corners of YouTubes Unlisted Video World

Delving into the realm of unlisted videos on YouTube is like uncovering‍ hidden treasures in a vast⁢ ocean. These videos aren’t indexed in search ‌results, ⁣and ‌they don’t pop up on⁤ your feed, ‌yet they hold a wealth of random, quirky, and exclusive content just⁣ waiting to be discovered. You might stumble ⁤upon ⁣someone’s personal vlog that they want to keep off the main channel, or perhaps a niche tutorial that never gained the spotlight but ⁣is exceptionally valuable. It’s a secret garden of video content that only those who have the link can access, making the hunt‌ for these gems feel like a scavenger hunt where ​every find is ⁤unique and intriguing.

So how do you go about finding these elusive videos? First, you can ⁤start by⁢ checking social media platforms where creators may share links without the clamor of‍ public visibility, such as Twitter or Instagram. Often, you’ll find people dropping hints or ‌outright sharing the⁤ precious URLs. Another useful tactic is to engage ‌with communities or forums focused ‍on specific interests related to your search; unlisted videos often pop up in conversations among dedicated fans. To give you ⁢a head start, here’s a simple table of popular sources where you might find unlisted videos:

Source Content Type Discovery Method
Twitter Creator Updates Search Hashtags or Profiles
Reddit Community Shares Browse Subreddits
Discord Exclusive Content Join Relevant Servers
Blogger/Influencer ​Pages Vlogs and Tutorials Check Their Posts

Exploring the Hidden Corners of ‍YouTubes Unlisted Video World

Mastering the⁣ Art of Searching: Tips ⁢to Discover ‌Unlisted Gems

When it comes to uncovering unlisted videos ⁣on YouTube, you’ll want to arm yourself with a few savvy techniques that can ⁤make all the difference. ‌Firstly, leverage specific​ keywords that are likely‌ to⁤ be stitched ⁣into these hidden ⁤gems. Think​ about⁤ what a creator might ⁢name⁤ their unlisted content, and don’t hesitate to throw in some variations or synonyms. Additionally, utilizing Google’s site search can⁤ be a game-changer. Just type site:youtube.com followed by your ⁤keywords right into the‍ search bar. This can often yield results ⁣for videos that don’t appear in regular YouTube ‍searches. Combining these tactics opens up a treasure trove of content you’d otherwise miss.

Another nifty approach is connecting ​with content creators directly. Many YouTubers share their unlisted ⁣videos with their dedicated followers, whether through social media, newsletters, or community posts. Engaging with them can not only bring new content into your view but also ⁤foster‍ community. Furthermore, consider exploring forums or subreddits dedicated to specific niches where users commonly share their⁢ findings. Here’s a quick ‌rundown⁤ of places to check:

  • Social Media ‍Groups: Look for​ Facebook or Discord⁤ groups focused ⁢on your interests.
  • Reddit ⁤Communities: Subreddits related to your favorite channels often have discussions about hidden content.
  • Creator Newsletters: Sign up ‌for updates‍ to​ find links to ‌unlisted treasures directly.

Mastering‍ the Art⁤ of Searching: Tips to Discover⁣ Unlisted Gems

The Power of Social Sharing: How Community Drives Unlisted Video Access

In the digital age, ⁤social ‌sharing has become the lifeblood of community interaction, serving as a bridge that connects people to unlisted content on platforms like YouTube.⁤ Think of it as a secret club;⁢ every member holds​ the‍ keys to⁤ hidden gems that can only be ‍accessed through word-of-mouth and their⁣ social circles. When users​ share unique links to⁤ unlisted videos, they’re not just passing on a video; they’re inviting ⁢others to experience something special, fostering an environment where creators ‍can flourish. This ​communal spirit often leads to a snowball ⁤effect, where the reach of these videos expands exponentially, much ​like a ‍ripple in water when a pebble is thrown​ in.⁣ Friends ‍share with ⁣friends who share with friends, and soon enough, the video is alive in ways the creator never imagined.

Moreover, the engagement that arises from sharing unlisted videos can catalyze discussions⁤ that enrich the viewing experience. It’s not just about watching a video; it’s about creating dialogues and‌ forging connections. When a ⁤community comes together over⁣ a shared interest,​ it can evolve into a passionate fanbase. Consider it a potluck dinner where everyone brings their own dish—each ‍unlisted video shared is a unique flavor added to the⁤ mix, sparking conversations‌ that might happen around the dinner table. This shared journey not only amplifies‌ the visibility of content but also strengthens community bonds, proving that sometimes, the most powerful insights are unearthed in the collective chatter of those who appreciate the craft of video creation.

The Power⁤ of Social Sharing: How Community Drives Unlisted Video Access

Unlocking ‍Privacy Settings: How Creators Keep Their Content‍ Under Wraps

When creators decide to keep⁢ their content under wraps, unlisted⁢ videos become their secret weapon. This feature allows them to share videos without making them visible to the general public. It’s like throwing an ‌exclusive party where only a select few can get in! Unlisted videos won’t pop​ up‍ in search results or ‌on the uploader’s channel, so it’s essential to have the link to view them. This functionality serves as a shield ‌for creators who want a small​ audience,​ ensuring that their content is shared⁤ only with⁢ trusted friends or loyal fans.

To navigate this secretive world‌ without getting lost, viewers must rely on a⁤ couple of strategies. First, if you’re lucky enough to have⁤ a friend who knows about these hidden gems, just ‍ask them for the link. Alternatively, many creators drop hints on their primary channels or social media accounts, enticing⁢ followers to dig deeper. Here’s a ‍quick rundown of tips to‍ help you uncover those elusive unlisted videos:

  • Follow creators‍ on social media: ⁤ Sometimes they⁢ share exclusive links through ⁤tweets or posts.
  • Join their mailing lists: ⁢Many creators keep​ their most loyal fans informed about hidden content.
  • Engage in communities: ⁣ Fan forums and Discord groups ​might share links to​ unlisted videos.

Unlocking Privacy Settings: How Creators Keep Their Content Under Wraps

Key Takeaways

And there you have it, folks! We’ve ventured deep ​into the hidden corners of YouTube and discovered the secret world of unlisted videos. It’s like finding a hidden treasure chest in a digital ocean—just waiting ‍for⁣ the right adventurer to uncover its gems. Whether you’re looking to ⁤access exclusive content from⁢ your favorite creators or just satisfy that curiosity, you now have the tools to unlock these mysterious⁣ videos.

But⁢ remember, with great power comes great responsibility! While it’s tempting to share all these ​newfound gems, be mindful ​of respecting creators’ wishes. Unlisted videos are ‌often private for a reason, and that little bit ⁣of internet etiquette goes a long ⁣way. ⁢So,‍ go ahead and explore!‍ Enjoy⁤ the​ thrill of the ⁤hunt, and who ⁣knows,‌ you might stumble upon your new favorite video!

If you’ve got any tips or stories about unlisted​ treasures you’ve discovered, we’d ⁣love‌ to hear from you! After all, YouTube ‍is a community, and sharing is what makes it all worthwhile. Happy viewing, and may your video quests be⁤ ever fruitful! 🌟

Unlocking Secrets: A Friendly Guide to Watching Private YouTube Videos

Curious about diving into the hidden corners of YouTube where private videos reside? You’re not alone! Picture this: you’re scrolling through your feed, and you stumble upon whispers about exclusive content that everyone is buzzing about, yet it’s behind a locked door. Frustrating, right? But don’t ‌worry; you won’t need a master ⁢key or⁢ a secret handshake to access this treasure trove of videos. In this friendly guide, we’ll unravel the mysteries of those elusive private YouTube videos and share ⁢practical tips for‍ gaining access ‌without any⁢ stress. So grab your popcorn, kick back, and let’s embark on this little adventure together!

Discovering​ the Hidden Gems of YouTubes Privacy Settings

Peeking ⁤into the world of YouTube’s privacy settings might feel like rummaging through a treasure chest—you never know what‍ you might find!⁤ When it comes to private videos, understanding how to​ navigate these settings can unlock exclusive content stored away like a family secret. YouTube allows users to adjust​ their privacy to ensure that only selected friends, or even ⁤yourself, can view their content. If you’ve been‍ invited⁢ to watch private videos, remember: you’ll need a link and the ‍right permissions. Here’s a little rundown of what to look for:

  • Permission from the Uploader: You can’t peek in unless the uploader has shared the ​video with you. Be sure to check your inbox for that link!
  • Account Adjustments: For seamless access,‍ ensure you’re logged into the​ same account ‌that the creator has shared with.
  • Direct Links: Sometimes, private videos are shared through links, so keep an eye out for those invitations!

If you’re feeling adventurous, diving into your privacy settings can help you share your own ⁢masterpieces with just the right audience. Adjusting your video’s privacy settings is like putting together a jigsaw ⁣puzzle where each piece ⁣represents a viewing option: Public, Unlisted, and Private. These different settings guide who gets to see your content. Check this simple breakdown:

Privacy Setting Description
Public Anyone can view and ⁢search for your​ video.
Unlisted Your video won’t appear in search results but can be viewed by ‍anyone with the link.
Private Only users you ​invite can ​watch. It’s like a VIP club!

Discovering the Hidden Gems of YouTubes Privacy Settings

When you ‌want to dive into ​the world of private videos, think of it like finding ‌a hidden treasure map. ‍First off, it’s crucial to respect privacy. These videos often come with restricted access ‍for a⁢ reason. But if you’re looking to unlock that content, reach out to the uploader directly. Start a conversation! A friendly message‌ can go a ‍long way in⁣ sealing the deal. You might just get granted access with a simple request, after all, sometimes all it takes is a little bit of charm and courtesy.

Here’s a handy ⁣checklist⁢ to keep you on track while navigating this maze:

  • Identify the video​ creator: Make sure you know who owns the content.
  • Send a polite message: ‌Introduce yourself and express your interest.
  • Follow their ‍guidelines: If they have specific requirements, don’t skip any steps!
  • Respect their decision: If they decline, just move on gracefully.

If you’re lucky enough to receive a link or‍ access, make sure to handle it with care. Keep in mind that sharing‌ private videos ⁣outside the original group or creator is like giving away someone’s secret recipe. To help you out, here’s a quick table outlining some best practices:

Best Practices What to Avoid
Ask permission before sharing Don’t distribute links without consent
Watch respectfully and ⁢engage Avoid passing judgment online
Keep the conversation⁤ open Don’t⁣ pressure for immediate access

Navigating the Maze: How to Access​ Private Videos Safely

Connecting with Creators: ​The Art of Requesting Video Access

Reaching out to creators for video access can feel a⁢ bit like knocking on a door you hope will be answered warmly. Start by crafting⁤ a genuine message that shows you’ve‌ done your homework. ​Mention specific details about their content that resonate with you. Did a particular ⁢video blow your⁤ mind? Or was their unique perspective on a hot topic‍ something that sparked your curiosity? Let them know! This personal touch not only flatters the creator but also lays the groundwork for a connection. Keep ⁢your tone friendly ‍and casual, almost like you’re chatting with a friend over coffee.‍ A sprinkle⁣ of humor can also⁢ go a long⁣ way, but make sure it fits their style. They’ll appreciate⁢ the effort you’re putting into reaching them.

When ⁣you finally send that message, be⁤ patient and ready for​ any response—whether it’s an enthusiastic yes or‌ a more cautious ‘let’s talk.’ Respect their ⁣comfort level; after all, it’s their ‍content. If they agree to share,‍ great! If not, gracefully acknowledged‌ their stance—after all, everyone has‌ different boundaries. You might even ask if they‍ have other exclusive content or ⁢suggestions for public videos that align with your​ interests. Keep your‍ communication open and positive, making ‍it⁢ clear that you value their work above all.⁢ Building this rapport can ⁣be beneficial, and who knows? This might just be the‌ first of many⁣ creative exchanges!

Connecting with Creators: The⁤ Art of Requesting‍ Video Access

Respecting Boundaries: Understanding⁣ the Ethics of ‌Viewing Private Content

When it comes to enjoying private content, like​ those hidden YouTube gems, respecting boundaries is essential. Just because ‌something is locked ⁤away behind privacy settings doesn’t mean it’s an open invitation to dive in. Think of ⁢it as peeking into a neighbor’s backyard—curiosity might get the better of you, but⁤ it’s ‌all about respect.⁢ Understanding the ethics surrounding private videos is crucial. It’s not just about ⁣the view count; it’s about recognizing that creators have their reasons for keeping things exclusive. This could range​ from personal expression ​to protecting sensitive information. Communicating with ‍the content creator directly—if possible—can sometimes lead ​to a more ethical path to accessing their⁤ material.

Additionally, ethical consumption of content can enhance your experience and⁤ preserve trust within the creator community. Here’s a quick checklist ​of what to consider:

  • Permission: Always seek​ explicit consent if you think you might be crossing a line.
  • Context: Why is the video private? Understanding the creator’s intent can shed light on the situation.
  • Respect: Remember, a ​creator’s work is ​a part of their identity; treat it ​with the same care you’d want for your own.

By prioritizing​ respect and consideration, you not only honor the creator but also‍ contribute‍ to a more⁣ supportive online community. So, the next time you come across a private video, take a step back and reflect before taking action. It’s about fostering relationships, not just accumulating views.

Respecting Boundaries: Understanding the Ethics of Viewing Private ‌Content

The Way Forward

So, there you‌ have it! Now that you’ve ​got the lowdown on accessing those elusive private YouTube videos, you’re not just⁣ a viewer; you’re practically a video sleuth! Just remember, whether it’s a hidden gem from a favorite creator or a behind-the-scenes peek into something exclusive, patience and positivity are key. Always reach out to the ‌uploader with a friendly request—most creators ‌appreciate their fan’s enthusiasm!

In‌ this big digital playground, let’s keep the spirit of sharing alive while respecting others’ boundaries. Who ⁣knows, maybe you’ll uncover some incredible content and forge deeper connections with fellow enthusiasts along the way. So grab​ those popcorns, maybe put on some comfy PJs, and ⁤dive into your next viewing adventure. Happy watching! 🌟

Unlocking YouTube: How to Check a Video’s Bitrate Easily

Alright, let’s dive into the world ⁣of YouTube magic! Have you ever streamed a video and wondered ⁤why some look razor-sharp while others seem muddier than a⁤ rainy day? Well, it often comes⁤ down to one secret ingredient: bitrate. You might be scratching your head, thinking, “What the ​heck is bitrate, ⁣and why should I care?” Hang⁣ tight, because today, we’re unraveling that⁤ mystery and ​showing you just how easy it is to check ⁢a video’s bitrate. ‌Whether you’re a budding content creator wanting to optimize your uploads or a curious viewer keen to understand video quality, knowing how to check bitrate will light up your ‍YouTube​ experience. So, grab your favorite ‌snack, and let’s explore ​how you can unlock the nuances of video quality with just a few simple clicks!
Unlocking YouTube: ‍How to Check a Video's Bitrate Easily

Understanding Bitrate: The Secret Sauce Behind Video Quality

Bitrate is ​like the magic ingredient in⁣ your⁤ favorite recipe ‌for video quality. Think of it as ‌the amount of⁤ data that gets packed into each second of video. The higher the bitrate, the ⁤more information is‌ crammed into ⁢those precious frames, which usually translates to a crisper and ‌more ‍detailed image. It’s similar to how a painter uses rich, vibrant colors to bring a canvas to life. So, whether you’re streaming the latest blockbuster or catching up on cat videos, a good bitrate ensures ⁤you’re⁢ getting the best visual feast.​ But beware! Not all videos are created equal, and this is where bitrate comes⁤ into play like a stealthy ninja behind the scenes, influencing everything from clarity to loading times.

To really appreciate how bitrate impacts⁣ your viewing experience, consider these key points:

  • Encoding Formats: Different formats, like H.264 and H.265, handle bitrate differently, affecting quality.
  • Resolution Matters: Higher resolutions, like 4K, typically require higher bitrates to maintain quality.
  • Network Conditions: If your connection is shaky, even a‍ high-bitrate video may not stream ⁤smoothly!

Imagine you’re trying to enjoy a gourmet meal, but it’s served on a paper ​plate. You wouldn’t get the full experience, ⁤right? The same goes for video. A balanced bitrate makes sure you savor every ‍detail of your ‍visual content,‍ making your viewing experience much more enjoyable!

Easy Steps to Check ​Bitrate on Any YouTube Video

Ever wondered what makes a YouTube video run so smoothly or, on the flip ​side, why some seem to lag? ⁢Well,​ that’s where bitrate comes⁣ in. It’s the amount of data that’s processed in a given time frame when ⁤you’re watching a video. Generally speaking, higher bitrates mean⁤ better quality—like upgrading from a cozy ​couch to a fancy cinema seat! If you’re curious to dig into the nitty-gritty of any YouTube video’s bitrate, it’s super simple. ‌Just follow these easy steps:

  • First, ​play⁣ the YouTube⁢ video you’re interested ⁢in.
  • Right-click on the player (or tap ‌on the three⁤ dots in the top right corner if you’re on mobile).
  • Select‌ “Stats for Nerds” from the dropdown menu.
  • In the stats‌ window that pops⁢ up, look for the “Current Bitrate” line—it’s ‍usually measured in kbps (kilobits per second).

And there you have it! By ⁤using this quick little​ trick, you can easily keep tabs on the quality of the videos you⁤ love. Want a quick‍ glance at ‍how bitrates vary across different platforms? Here’s a simple breakdown ⁢to ​give you an idea:

Platform Typical Bitrate (kbps) Quality Level
YouTube 480‍ – 4000 SD to 4K
Netflix 500 – 2500 SD to 4K
Twitch 300 – 6000 SD to 1080p

Isn’t it ‌fascinating to see how various platforms stack up? Now you’ve armed yourself with​ all the knowledge to decode video quality like a pro!

Easy Steps to Check Bitrate on Any YouTube Video

Why Bitrate Matters for Your ⁤Viewing Experience

When you dive into the world of online videos, especially on platforms like YouTube, the ‍concept of ⁣bitrate can feel a bit like a secret handshake. It’s ⁤that ⁣behind-the-scenes hero that plays a ⁣huge role in determining ⁤how smooth, sharp, and downright enjoyable your ‍viewing experience ⁤will be. Think of bitrate as ⁣the lifeblood of video quality—it’s all about‌ how much data is‍ transmitted‍ each⁢ second during playback. Higher bitrates mean better ‌quality, delivering⁣ those crisp visuals and clear sounds that​ make you feel like you’re right there in the action. On the​ flip side, a low bitrate can leave you grappling with pixelation, buffering, and sound that might as well be coming from a tin can. Who wants to struggle through that when there are so many amazing videos to watch?

But, here’s the kicker: checking a video’s bitrate is super easy‍ and totally enlightening! You can ‌actually unlock a treasure trove of⁢ knowledge about what makes your favorite clips tick. Here’s a simple breakdown of why it matters for⁢ your viewing pleasure:

  • Picture Quality: Good bitrate means sharper⁤ images with vibrant colors.
  • Sound Clarity: Higher⁤ rates lead to rich, immersive​ sound that brings ‌videos ‍to life.
  • Streaming Stability: A steady bitrate keeps the flow smooth, reducing those pesky interruptions.

So, whether you’re a casual viewer or ⁢a die-hard‍ audiophile, understanding bitrate can totally transform how you enjoy your content. Knowing how to check it can ⁢help you make informed choices about which videos to dive into next, ensuring you always get⁤ that top-tier experience you crave!

Optimizing ​Your YouTube Experience: Tips​ for Better Streaming

When diving into the ocean of YouTube, it helps to have a⁣ sturdy lifebuoy in the form of optimized streaming. Imagine trying to​ watch a breathtaking travel vlog in the middle of a pixelated mess! By keeping an eye⁣ on the video’s ⁤bitrate, you’re setting yourself up for a much clearer and more enjoyable experience. Higher bitrate often means‌ better quality, especially when those ⁢videos are bursting with colors and action‍ sequences. So how do you check this hidden gem? You can ​often peek behind the curtain of video settings ⁣or use third-party tools to gauge the quality lock and ensure your streaming runs smooth ⁤as butter. No one wants to be buffering while the best⁢ part is⁤ happening!

Don’t let environmental factors mess with your vibe! Your Internet speed plays a crucial role in your YouTube experience, and understanding your video’s bitrate can be a game ​changer.‌ You want that sweet spot where quality meets stability, kind of like a ⁤perfect dance balance. ‌Here’s a quick look at average bitrates for various video resolutions, so you can gauge what to expect when​ you hit play:

Resolution Recommended Bitrate (Mbps)
480p 2.5 – 5 Mbps
720p 5 – 10 Mbps
1080p 10 – 20 Mbps
4K 25 – 50 Mbps

By knowing these numbers, you can tweak your settings and make⁢ sure that you’re not left in the digital dust when streaming your favorite content! Who wouldn’t want to watch videos that look as stunning as the movie theater ‌experience, right? So, get in there and optimize!

Optimizing Your⁢ YouTube Experience: Tips for Better Streaming

In Retrospect

And⁢ there you have it! We’ve unraveled the‍ mystery of checking a video’s bitrate on YouTube, making it easier than ever to ‍tweak your viewing experience. Whether you’re a casual browser just wanting to ensure smooth streaming or a budding creator keen on perfecting your content, understanding bitrate can make a world of difference.

So, next time you hit play,⁤ why not take a moment ​to explore⁣ these tips? ⁢After‌ all, knowing the behind-the-scenes stuff is like having the ultimate backstage pass ⁢to the show. And who ⁢doesn’t love a little more control over their digital experience, right?

If you found this‌ guide helpful, don’t hesitate⁤ to dive deeper ⁣into the world‌ of video quality. There’s so much more to explore! Keep experimenting,⁤ keep learning, and remember—every click brings you one step closer to mastering the art of YouTube. ⁢Happy watching! 🎥✨

Mastering YouTube: A Simple Guide to Snipping Your Clips!

Are you ready to dive into the world of YouTube like never⁢ before? Imagine ‍having ⁤the power⁤ to turn your long videos into ⁢bite-sized, shareable clips that keep your audience hooked and ⁢craving‌ more. ⁢Whether you’re ⁢a content creator looking to enhance your channel or⁣ just ⁢want to ‍showcase your favorite moments with friends, ⁢mastering⁤ the art‌ of snipping clips is the key. It’s not as ​daunting as it sounds! ⁢In this simple guide, we’ll⁤ walk ⁤through ‌the essential steps ⁢to​ make your ⁢editing process a breeze, transforming your raw footage into engaging ‌snippets that shine. ​Let’s get⁤ snipping and make your content pop!

Unlocking the Art of ‍Snipping: The Tools You Need⁤ for Seamless Editing

When it comes to snipping your ‍YouTube clips⁢ with finesse, having the right ​tools ⁢in‌ your toolkit is crucial. From beginner-friendly ⁢options to⁤ advanced ⁢software, there’s a whole universe out⁢ there waiting for you. Here’s a quick rundown of​ essentials ⁣that⁢ can⁣ transform your editing experience:

  • Screen ‌Capture Software: ⁣Programs like OBS Studio or Camtasia let ‍you grab⁢ exactly what ⁣you want⁤ from your screen, which ‌can be ⁢powerful for creating tutorials ⁤or capturing gameplay.
  • Editing⁢ Software: Apps such ⁢as Adobe Premiere ​Pro ​or Final Cut Pro are the Ferrari of ‍video‍ editing—flexible ‍and robust ⁤for professionals. If you’re looking ‌for something lighter, try apps like iMovie‌ or Shotcut that are ⁣easy to⁣ use yet pack a punch.
  • Snipping Tools: Whether it’s Snagit for screenshots‍ or ⁢simple tools like Windows Snipping Tool, ‌being able to‌ capture and annotate is a ​game changer for planning your clips.

Besides these high-tech solutions, don’t forget the importance ​of having the right accessories. Quality⁤ headphones help‌ you catch subtle ⁢audio cues, ⁤ensuring your snips ⁤sound just as good⁣ as⁢ they look.⁢ And ⁢if‌ you’re ⁤serious⁢ about elevating your editing, consider a‌ dedicated video editing keyboard ⁢to‍ streamline⁤ your ​workflow—it’s ⁢like ⁣having​ a trusted sidekick by your side! Here’s a quick comparison of ⁢some popular editing ‌tools:

Tool Best For Price Range
OBS Studio Screen recording Free
Adobe⁢ Premiere Pro Professional editing $20.99/month
iMovie Beginners Free (Apple devices)

Unlocking the‍ Art of‌ Snipping: The Tools You Need ​for Seamless Editing

Capturing ‍Gold: How to Identify⁣ and Isolate Your Best Moments

Finding those pure ‍gems in your⁣ videos can‌ feel like⁣ panning‌ for gold in⁣ a river—it’s all about patience and a keen‍ eye. When you’re reviewing your footage, look for moments that truly resonate, whether⁣ it’s a funny ​quip, an ​unexpected surprise, or a​ significant ⁢insight. Here are some indicators to ⁤help you‌ spot that treasure:

  • High Energy Levels: Moments where you or your subjects are particularly animated or​ enthusiastic can capture viewer⁤ attention.
  • Emotional Impact: ​ Clips ⁢that evoke strong feelings, whether laughter or⁣ inspiration, often stick‌ with your audience.
  • Unique⁤ Angles: Sometimes, it’s the unconventional shots ‌or perspectives that tell the‌ story best.
  • Clear Messaging: Look for moments that convey your ​core‍ message clearly; these ‍snippets⁢ can be ⁢powerful standalone clips.

Once you’ve identified those standout‍ moments, it’s time to isolate them. Think of this ​as sculpting‍ a masterpiece out ⁣of marble—getting⁣ rid of‍ excess to reveal the beauty underneath. Use⁣ editing​ software to cut ⁢out distractions surrounding your chosen clips,⁣ focusing on tight ⁤transitions and smooth flow.⁣ And don’t shy away from layering sound effects or ⁤music to enhance the mood. Here’s a ⁣simple breakdown of useful editing​ techniques:

Technique Purpose
Trimming Eliminates unnecessary parts to keep⁤ the clip concise.
Cutting Removes awkward pauses or mistakes, boosting the clip’s impact.
Transitions Adds flair⁤ and smoothness between ‌clips.

Capturing ⁣Gold: How to Identify and‍ Isolate Your Best Moments

Polishing Your Clips: Techniques for Enhanced ‌Engagement and Discovery

When‍ it comes to‌ enhancing your ​clips‌ for both engagement and discovery, you’ve got to think⁣ like a curator. Treat each clip like a precious gem, and​ polish it⁤ until it shines! Start by choosing the‌ right thumbnail,⁤ as it’s your ​first impression—make it eye-catching and relevant. ‌ Bold colors,⁢ engaging⁣ facial expressions, and easy-to-read ‍text ⁤can work wonders.​ And don’t forget about SEO; use keywords in your titles and descriptions that reflect what viewers are searching‌ for. ⁢Sprinkle in some hashtags too; they help widen your net and ⁤reel in a broader audience.

Next ‍up, focus ⁤on the content ​flow. No one likes a clip that ⁣drags on like ⁤a rainy‌ day,‍ right? ⁣Keep your pacing snappy and engaging. Here are some techniques to consider:

  • Hook them early: Capture attention ⁤within ‌the first few seconds.
  • Engage‌ through questions: Ask, “Have you⁢ ever…?” to draw viewers in.
  • Call ‍to Action (CTA): Include‌ reminders ‌to like, ⁢share, and subscribe.

And ⁢don’t shy away from using fun graphics or captions to⁢ emphasize key points. ​Changing up your visuals⁣ can create a⁢ dynamic viewing experience that keeps people ⁤glued ⁣to the screen. In⁣ the realm ‌of video, being creative and relatable can be ⁤the shiny polish⁣ that transforms your clips⁤ into magnets for engagement.

Polishing Your Clips: ⁤Techniques for ‍Enhanced ⁢Engagement ⁢and Discovery

Sharing Like a ‌Pro:​ Strategies for Perfectly ⁤Timing Your Snipped Clips

Timing ⁤is everything ‌when it comes to sharing snipped clips. You want to release ‌your content when your audience is most ⁤likely to engage with it. Think of⁤ it like throwing a big party – you⁤ wouldn’t want to start ​when everyone’s‌ still at work, ​right? Here⁣ are some ⁣ strategies to ⁢nail that perfect timing:

  • Know⁣ Your Audience: Analyze your viewers’ habits. Use ⁤tools like ⁣YouTube ‌Analytics to pinpoint ‌when ⁤they’re‌ most active.
  • Be Mindful of Time⁤ Zones: ​If your audience spans different regions,⁤ consider their time zones.‌ A clip shared‌ at ​the right moment can attract a wider crowd.
  • Engage with⁣ Trends: ⁣ Timing your clip‌ release around popular trends or current events can skyrocket ⁢views. Don’t be afraid to ride the wave​ of what’s​ hot!

Once you’ve ⁤found​ the⁤ optimal time, it’s ‌all ​about how⁣ you share those clips. ​Treat it like a sneak peek at‍ a movie that everyone’s dying to see.‍ You want to ​create buzz! Consider these tips for sharing:

  • Social‌ Media Blitz: Blast your⁣ clips ⁤on all your platforms, but tailor the message for⁢ each one. A catchy tweet⁢ works wonders!
  • Engage in‌ Conversations: Don’t just drop ⁣the ⁢link and⁢ disappear. Be available to chat, ‌respond to comments, and keep the excitement alive!
  • Schedule Wisely: Use ‍scheduling tools to share ‌clips when your audience​ is ⁣online, ensuring⁢ maximum visibility ⁤and engagement.

Sharing Like a Pro: Strategies for Perfectly Timing Your Snipped Clips

Final Thoughts

And⁤ there you have it! Your journey​ to ⁤mastering YouTube ⁣and⁣ snipping those clips like‌ a pro is just ‍a few clicks away. Isn’t it wild how ‍a bit of ⁣editing magic can transform your raw footage ‍into captivating content? It’s like turning a plain old‌ apple into a delicious pie—with just the⁢ right⁢ slices and ingredient mix!

Remember, practice ⁢makes perfect, ⁤so don’t⁢ be shy about experimenting ⁣with your ​snippets. Each video ⁣you⁢ create ​is not just a chance to ⁣showcase ‌your skills but also a ⁤little piece⁢ of yourself that you’re ⁣sharing with the world. Embrace the⁣ process, learn from your mistakes, and keep refining your craft.

So grab those scissors—figuratively speaking, of ​course—and start snipping away!‍ The‌ YouTube universe is waiting⁤ for⁤ your ​unique voice ⁣and vision. Go on, make those clips sing! Happy editing!

Unlocking YouTube: Your Guide to Finding Video Transcripts

Ever find yourself ‌lost in‌ a sea of YouTube videos, wishing you could quickly skim through ⁤the content without hitting play? You’re not alone! Video‍ transcripts are like treasure maps, ‍guiding us straight to⁤ the⁣ golden ‍nuggets of information without ​getting sidetracked by ⁢cat ‍videos⁢ or ‍those never-ending⁤ vlogs.‍ Whether you’re a student‌ trying to​ grasp complex topics, a professional hunting for ‌expert insights, or just someone who wants to revisit that clip without the hassle, having access⁣ to ‌video transcripts can be a game changer. So, let’s dive into the ⁢world ⁣of⁤ YouTube transcripts and unlock the full‍ potential of your viewing experience!

Exploring ⁤the Hidden⁣ Gems of YouTube: How to⁤ Access Video Transcripts with Ease

Exploring​ the Hidden Gems of YouTube: How to ⁢Access Video Transcripts with Ease

Diving into the depths of YouTube can sometimes feel⁣ like searching for⁣ buried‍ treasure, especially when‍ you’re on the hunt ⁤for video⁢ transcripts. ‌The ⁢power of transcripts lies not just in accessibility but also in enhancing your learning experience. Imagine being able to skim through a video’s content instead of watching the entire thing! To access these transcripts, simply click on the⁢ three ⁢dots beneath the‍ video, and if it’s available, you’ll see an option‍ that⁢ says “Open ​transcript.”⁢ This will dump a⁤ world of words ⁤right at your fingertips, letting you navigate⁣ to the parts that​ matter most‌ to you.

Not​ all videos come with transcripts, but that ⁣doesn’t mean you’re out‌ of luck. You can use third-party services that generate transcripts for you. Here are some simple tips to consider:

  • Check⁢ the⁣ video description: Sometimes, the ⁤creator might link to ‍a full ‌transcript or provide a summary.
  • Use built-in ⁣tools: Features like ⁣auto-generated‌ captions ⁢can be rephrased into a ‍neat⁢ transcript.
  • Utilize transcription ⁤software: Tools ⁢like Otter.ai​ or Descript‍ can create text from audio.

Finding⁣ transcripts can be a game changer, especially for ​study sessions or when‍ multitasking is necessary. Think of it as having a digital study buddy ‌that’s always ready to sum it up!

Navigating the​ Settings: A Step-by-Step Approach to Revealing Transcripts ⁢for Any Video

Getting your hands ‌on video transcripts on YouTube​ is easier than you might ‌think!‌ It all starts ⁣with ⁢a few clicks. First, hit ‌play on the video you’re curious about, and just below the video, look for the ​three ​dots​ (or⁤ ‘More’ option) next to the thumbs up/down ⁣buttons. Go ahead ⁣and​ click​ on them. Can you‌ see a little option⁢ that says⁢ “Open Transcript”? If the video ​creator has enabled transcripts, you’ll find it there.​ Clicking it will reveal a side panel filled⁢ with⁣ text, displaying the⁣ entire transcript⁣ synchronized ‌with the video. It’s‌ like having a‍ cheat sheet right at⁣ your fingertips!

If you want to dive deeper and make sense ⁢of that transcript, there’s​ an‌ extra layer ⁤of functionality you ⁢can take advantage of. Once you’ve opened the transcript, ⁣you can⁣ also click ⁣on any line to jump ‍straight to ​that moment in‍ the video. This can be a game-changer, especially ⁢if you’re ‌looking​ for specific information or quotes. ‍Remember, ​not all​ videos have this feature,⁣ so don’t‌ sweat ⁣it if you don’t see the option. But if it’s there, ‍you’re ‍basically holding​ a‍ treasure map to every ⁢important detail in the video, all thanks⁢ to the creator’s effort in making their content accessible!

Maximizing Your Learning: Tips for Using Transcripts to ​Enhance Your YouTube‍ Experience

Maximizing Your Learning: Tips ‍for Using Transcripts to Enhance Your YouTube Experience

Using ⁤transcripts can dramatically shift⁤ your YouTube experience from passive watching to active‍ learning. Have ​you ever found yourself replaying a segment just​ to ⁣catch a ‍key point? Transcripts ‍eliminate that hassle‍ by allowing you to ‌skim through ‍text quickly. They serve ‍as ⁢a roadmap, highlighting essential⁣ ideas and insights. This way, you’re not just a⁤ viewer, but a participant in the learning process. You can‌ underline concepts, highlight quotes, or​ even create⁤ notes ⁢directly from the transcript. It’s like ‌having ⁣a​ personal‌ study ​guide handy at all times.

Moreover, transcripts ‍cater to different‌ learning styles. If you’re an⁢ auditory learner, listen along with the transcript to reinforce your understanding. ⁣Visual learners can⁢ follow along with the text, making ‍connections⁣ more easily. To maximize your ​time, consider⁤ these​ tips:
‍ ‍

  • Search‍ for specific terms ‌in the transcript to jump directly to relevant sections.
  • Pause ​ frequently to jot⁤ down your thoughts as ‌you go ​along.
  • Use ⁢transcripts for review sessions—they’re⁣ invaluable for recalling ‍information later.

This could elevate your YouTube binge-watching sessions into ‍a more‍ targeted⁢ learning experience, giving⁤ you‍ far more than just entertainment.

Transcripts Unleashed: The⁢ Benefits ⁣of Utilizing Video Text to​ Boost Accessibility and ‍Engagement

Transcripts Unleashed:⁢ The Benefits of Utilizing Video Text to Boost Accessibility and Engagement

Ever found yourself ⁤struggling⁤ to ‍grasp everything in a YouTube video? It can be overwhelming ⁤when ideas⁤ are ⁢flying around⁢ and visuals compete for ⁢your attention.​ This is⁢ where the magic⁢ of video transcripts comes in. They‌ act like GPS ‌for ⁢understanding, guiding⁢ you ⁣through the‍ content while you navigate the visual chaos. You get not ⁤just captions but ⁣a detailed roadmap of everything ⁤being⁣ said,‌ making it‌ easier‌ to ⁣follow along,⁣ take​ notes, or review later. ‍Plus, transcripts are a game changer for accessibility, ensuring that everyone, regardless of hearing ability, can engage‌ with the⁢ material. Think of it ‍like having⁣ a friend ⁤narrate ⁣a ​movie while you watch—helpful, right?

Utilizing video⁢ transcripts can⁣ significantly amplify your learning experience. They offer key benefits like:

  • Enhanced Retention: Reading ‌while watching helps solidify information in your memory.
  • Quick ‌Reference: Need to find a specific ⁢point? A⁣ transcript‌ allows you to skim​ through ‍the content ‌at lightning speed.
  • Increased Engagement: Captions can make viewers feel more involved and attentive, almost like they’re participating​ in a conversation.

In short, video transcripts flatten the‍ curve between content creation ‍and ⁣consumption. They turn‌ a regular viewing experience into a multi-dimensional learning event,‌ giving everyone the opportunity ⁤to engage ⁣deeply with the material.

Final Thoughts

So there you have it! Unlocking YouTube transcripts is⁢ like finding a treasure map ⁢to the hidden gems of knowledge tucked ​away in your favorite videos.​ Whether you’re diving deep into educational content, trying to grasp a⁣ new language, or just need a little⁣ help catching ‍every word in that‌ hilarious vlog, those transcripts ⁢can be your best buds. ​

Next time you hit play, think ‍of transcripts ‌as your trusty‍ sidekick, ‌guiding you through the⁣ YouTube universe. And ‍don’t forget — exploring those options can make your viewing ⁢experience ​not just⁤ more accessible but also way more enriching. So go ahead, give it a whirl! Happy​ viewing, and may your YouTube adventures be ⁢ever insightful!

Why Your YouTube Playlist Won’t Autoplay: Too Big?

Picture⁢ this: you’re all set for a cozy binge-watching session, ⁢ready to ‍dive⁤ into your meticulously‍ curated YouTube playlist. You kick⁣ back,⁤ hit play, and… nothing. Silence. Your playlist, which should be your ticket to ​endless entertainment, just ‌sits there, untouched. What gives?‍ The truth is, many folks‌ encounter the ‍perplexing issue⁣ of‌ their​ YouTube playlists not ⁣autoplaying, and ⁤one of ⁣the sneaky culprits could be ‍the size of your playlist. Too big?‍ Yep, that can throw a wrench in your viewing plans. Let’s‍ unravel this conundrum and explore⁣ why‍ your playlist might​ be refusing ‍to take you on a ⁢non-stop ‌journey ​through your favorite ‍videos!
Why Your YouTube​ Playlist Won't Autoplay: Too ‌Big?

The Autoplay Dilemma: ​Understanding ‍Playlist‍ Limits

When ⁤you hit play on a massive YouTube playlist,‍ you might expect it to​ roll through​ each video​ like a well-oiled machine, right?‌ But here’s where things get tricky. Sometimes, the​ sheer size of your playlist can⁤ actually hinder its ability to autoplay. Ever thought ⁤about that? ⁤With playlists that contain hundreds or even thousands of videos, YouTube’s ​algorithm may struggle ‌to manage⁢ them‌ all efficiently. ​Instead of smoothly transitioning ​from one video to another, you ⁣might find ⁣yourself staring at a ⁤frozen screen or⁢ an awkward pause,​ wondering what went wrong. It’s like ​trying to fit ​too many‌ ingredients in⁢ a blender; sometimes, too much is just ⁣too⁢ much!

Moreover, playlist settings ⁣don’t ​always play ⁢nice with size limits. You might have to dig into your ‌playlist ​settings to ‌check⁤ if autoplay is enabled—because you know, the platform also wants to‍ keep you engaged without overwhelming you. Here ⁤are a few factors‍ that could contribute to your autoplay‌ issues:

  • Playlist Size: More videos can complicate playback.
  • Video Length: Long⁣ videos may result in longer delays between​ plays.
  • Network Issues: Sometimes the culprit is ⁣just a sluggish internet connection.

Understanding these limitations can help you better ⁤curate your playlists,‌ ensuring that your viewing experience remains seamless. A smaller, well-organized playlist might just be the key to keeping that ‍autoplay feature humming along!‍ Who wouldn’t want that uninterrupted flow of ‍their favorite content?

The Autoplay Dilemma: Understanding Playlist Limits

The‍ Weight of Options: ⁣How Playlist ‍Size Affects Autoplay

When it comes‍ to playlist size,⁣ you⁢ might be surprised at ‍how it‍ can impact the autoplay feature on YouTube. Imagine⁤ diving‍ into ​a huge⁢ buffet, filled with all kinds of delicious dishes.‍ You get overwhelmed, right? This ⁢is‌ similar to what happens when a ​playlist is too large, causing YouTube to hesitate before playing the next video. The platform seems to struggle with the sheer volume of ‍choices, which can lead to frustrating instances where autoplay just won’t​ kick in. ⁣Think about⁢ it: if your ‌playlist has dozens or‌ even hundreds of videos, do‍ you⁢ really expect the algorithm to effortlessly serve ⁣up the next ⁢clip? ⁣It’s like⁤ asking a chef to whip up a ⁢complicated meal⁣ when there‌ are too many ingredients to consider.

Plus, with so many options available, user engagement can take a hit. ⁤Smaller playlists often mean more targeted content, allowing ⁢the algorithm to gauge viewer preferences more efficiently.⁢ If you’re hitting that autoplay wall, consider⁣ trimming down your selection or ‌creating a couple of focused playlists. You could even try ⁤categorizing your ‌videos⁤ based on ⁣themes or moods – like a well-organized​ bookshelf.⁢ A‌ few curated choices can lead to a smoother and more enjoyable autoplay experience, keeping viewers ‌engaged instead of scrolling through a maze ​of ⁤potential picks.

The Weight​ of Options: How Playlist Size⁣ Affects Autoplay

Trimming ⁣the‍ Fat: Tips⁢ for a Seamless Viewing⁤ Experience

Sometimes, less truly ​is more. When your YouTube playlist becomes a dizzying collection​ of videos, ‍it can cause ​a hiccup in autoplay functionality. ⁣Instead of diving straight from one music video to⁤ the ​next, you might⁣ find ⁣yourself staring at⁢ a loading screen, wondering what‌ went wrong. To make the most of your viewing experience, consider trimming down your playlist. Here are some tips to make your playlists‌ leaner and⁢ meaner:

  • Prioritize‍ Your Favorites: Keep⁢ the ⁢tracks you love‌ the most. It’s‌ like curating your personal mixtape; only include the songs⁢ that ignite joy.
  • Cut the Duplicates: Remove any repeat videos. It’s like having three copies of the same ‍book – unnecessary and cluttered.
  • Group by ‍Mood: Organize playlists by themes ⁤or⁢ vibes. Whether it’s a chill ⁣night in or a pump-up session, align your‍ choices for seamless transitions.

While you’re at it, try to keep your playlists under‍ a certain size. Just⁢ like a well-structured​ meal, balance is key.⁤ If ⁤your playlist exceeds a few dozen videos,​ it⁤ might just be too hefty⁤ for the autoplay⁢ to digest ⁤smoothly. ⁣Consider this⁢ handy table ‍for a quick reference on playlist sizes:

Playlist ‌Size Performance
1-20 ​Videos Optimal‌ Autoplay Experience
21-50⁢ Videos Good, but may lag
51+ Videos Possible Autoplay​ Issues

Simplifying your playlists not only helps with ‍smooth‍ playback⁤ but enhances your overall enjoyment. After ⁢all,⁣ who wants to deal with buffering breaks⁢ in the middle of a jam? Trim⁣ the fat, ‍and you’ll be‍ rocking out in no time!

Trimming the Fat: Tips for a ⁢Seamless Viewing Experience

Tech Troubles: Common Fixes for Autoplay Woes

If your YouTube playlist ⁣is ‍giving you‌ the ⁣cold shoulder and refusing to autoplay, it can be‍ downright frustrating. Sometimes, the⁣ issue⁤ could be as simple as having an overly ambitious‌ playlist. Yes, bigger isn’t always ⁤better! A ⁣playlist ⁢that’s too long can actually⁢ confuse the ⁤algorithm, causing it to decide it’s just not worth the⁢ trouble. Consider breaking it up ‌into smaller, themed playlists instead. Not⁣ only does this make your viewing experience ‍smoother, but it also keeps your favorite​ songs or videos grouped ‌together, making it easier to binge-watch‌ or listen without interruption.

Also, don’t forget to‌ double-check‌ your⁣ autoplay settings! It’s easy ⁤to​ overlook those ‍little toggles nestled deep in your account settings. Make⁢ sure the Autoplay switch is turned on – if it’s greyed out, ⁢that’s‌ your cue that something’s amiss. Additionally, keep an eye on device compatibility; sometimes, the platform just doesn’t play nice with older‍ devices. Check if‍ you’re running on the latest version of the app ​or ⁣browser. Here’s ⁢a quick checklist for you:

  • Break large playlists into ​manageable sizes.
  • Confirm ⁢your autoplay setting is toggled on.
  • Update your app or browser​ to the latest version.

Tech Troubles: Common Fixes for Autoplay Woes

Concluding ​Remarks

And there⁢ you have it! If​ you’ve found⁣ that your beloved YouTube playlist isn’t autoplaying, it might just be a case of⁤ going ​overboard ‌with those video choices. ⁢Think‍ of⁢ it like ‌packing for ⁢a vacation—the more you try to squeeze in, ⁣the less likely you are⁣ to remember ⁢that ⁤one essential pair of flip-flops! So, next time⁤ you’re setting up your playlist, keep it streamlined ​and focused. ⁣Not only‌ will you⁢ avoid⁢ those autoplay ‍hiccups, but you’ll make your viewing experience all the more ⁤enjoyable. ‌

So, pour yourself a ⁢drink, kick back, and let ⁢the music play. And if you encounter any hiccups along the ⁣way, you’ve⁤ got the tools to troubleshoot like a pro. Happy‍ watching, and may your‍ playlists flow as smoothly as ‌your favorite jam!