Ever thought about transforming a corner of your home into a buzzing YouTube studio? Imagine swapping the ordinary scenery of your living room for a vibrant space where your creativity can truly shine. Crafting your very own DIY YouTube studio isn’t just about the gear; it’s about curating an environment that reflects your unique personality and passion. Whether you’re aiming to create how-to videos, vlogs, or deep-dive discussions, setting up a space that’s not only functional but also inspiring can make all the difference. So, roll up your sleeves, grab some paint, and let’s dive into the exciting world of building your ideal creative video haven!
Designing an Inspiring Backdrop That Tells Your Story
Imagine stepping into your own creative hub, a space that radiates your personality and passion. The backdrop of your videos is like the stage in a theater, setting the scene for every performance. To create this inspiring environment, focus on visual storytelling. Use colors that resonate with your brand and evoke the right emotions. Add elements like a cozy bookshelf, art pieces, or your favorite collectibles—these can all serve as great conversation starters and give your viewers a glimpse into who you are. Think of it this way: just as a great book draws you in with its cover, your backdrop should entice viewers to stick around and explore more of your content.
To really nail down the vibe, consider incorporating textures and lighting that reflect your style. Want a cozy, intimate feel? Soft lighting paired with warm hues can do wonders. Or perhaps a modern, edgy vibe is more your speed—cool shadows and bold colors can make a striking statement. Don’t shy away from personal touches! Handwritten notes, your favorite quotes, or even your latest adventure snapshots can add that unique flair. Here’s a simple breakdown to think about:
| Element | Purpose |
| Color Palette | Sets mood and tone |
| Lighting | Creates ambiance |
| Personal Items | Highlights personality |
Choosing the Right Gear Without Breaking the Bank
When it comes to setting up your DIY YouTube studio, you don’t need to drop a small fortune to get quality gear. Think of it like building your dream treehouse—sure, you want it to be sturdy and fun, but you also want to keep it affordable. Consider what’s essential for your videos: a decent camera, some good lighting, and quality audio gear are your best bets. Instead of splurging on the latest tech, look for second-hand equipment or entry-level options that pack a punch. Websites like eBay, Facebook Marketplace, or even your local thrift store can be gold mines for finding hidden gems that won’t strain your wallet.
Another tip is to embrace DIY solutions for some of your gear. For instance, you can make your own lighting setups using inexpensive LED bulbs and white sheets to diffuse the light. And when it comes to audio, a budget-friendly lavalier mic can work wonders—and if you get crafty, you can create a pop filter with a wire hanger and some pantyhose! Check out the table below for a quick comparison of essential gear, showing both budget and premium options:
| Gear Type | Budget Option | Premium Option |
|---|---|---|
| Camera | Logitech C920 | Canon EOS M50 |
| Lighting | Neewer 660 LED | Godox SL-60W |
| Microphone | Rode VideoMicro | Shure SM7B |
Lighting Secrets for Stunning Video Quality
Lighting is like makeup for your video—get it right, and you’ll look absolutely stunning! The first trick up your sleeve is soft, diffused light. Instead of harsh shadows that can make you look like you just stepped out of a horror flick, use softbox lights or even natural light filtered through a curtain. This technique offers a gentle glow that is super flattering to your skin tones, making it a game-changer for talking heads or tutorials. Additionally, consider the three-point lighting method: a key light to illuminate your face, a fill light to soften any shadows, and a backlight to separate you from the background. It’s like the perfect lighting cocktail that ensures you always shine bright on camera!
Don’t overlook the magic of colors, either! Using colored gels or LED lights can add depth and personality to your videos that bland white lights simply can’t deliver. Think of it as the cherry on top that separates the pros from the amateurs. You can create a cozy vibe with warm tones or go for a futuristic look with cooler hues. Experiment with the lighting placement as well; side lighting can create dramatic effects, while lighting from above can give off that cinematic glow. Remember, the right lighting can turn even the simplest setup into a visually captivating experience that keeps your audience glued to their screens.
Soundproofing Hacks for Crystal Clear Audio
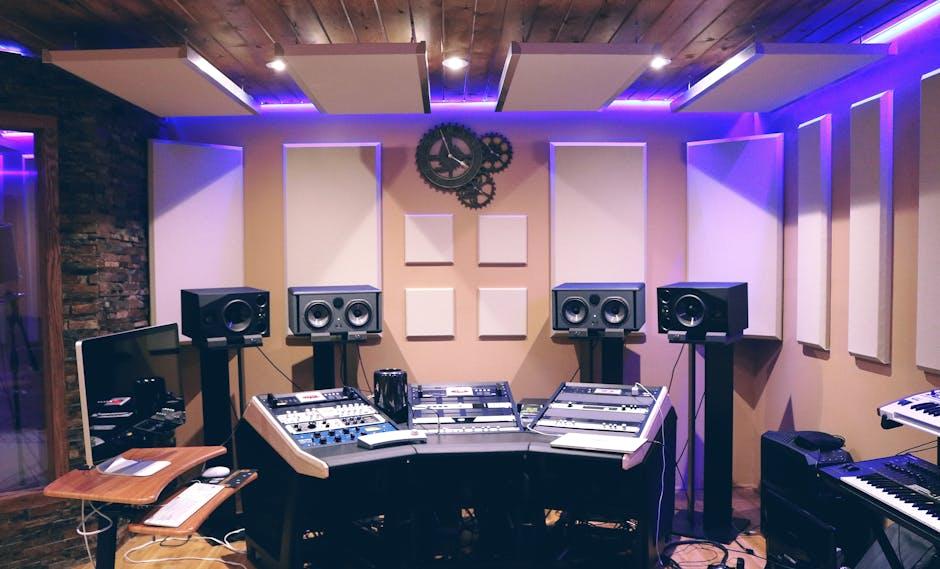
Got a passion for creating YouTube content but find the background noise driving you up the wall? Soundproofing your space can make a world of difference, transforming your audio quality from “meh” to magnificent! You don’t need a ton of cash or fancy equipment to achieve this. Instead, look around—what do you already have? Here are some simple yet effective hacks you can implement right now:
- Hang Thick Curtains: They not only beautify your space but also absorb sound. Opt for heavy drapes whenever you can.
- Rugs and Carpets: If you’ve got hard floors, throw down a few carpets. They’ll sting the echoes and give your studio a cozy vibe.
- DIY Acoustic Panels: You can easily make these by wrapping insulation board in fabric and mounting them on your walls.
- Seal Gaps: Don’t forget those small gaps around windows and doors. A little foam tape can go a long way in preventing sound intrusion.
Don’t overlook the ceiling—that’s a sound’s secret passageway! If you’ve got neighbors above, consider adding a suspended ceiling or acoustic tiles. These absorb sound and can dramatically reduce noise seepage. Another nifty trick is to use furniture placement creatively; a big bookshelf loaded with books can serve as a sound barrier! Want to get a bit more technical? Using a basic decibel meter app on your phone can help you identify the loudest culprits in your space. Here’s a quick table to showcase soundproofing materials and their effectiveness in reducing sound levels:
| Material | Noise Reduction Level |
|---|---|
| Thick Curtains | Moderate |
| Rugs | Low |
| Acoustic Panels | High |
| Ceiling Tiles | Very High |
The Conclusion
As you wrap up your DIY journey in creating the perfect YouTube studio, think of it as building your very own creative fortress. Every light you position, every backdrop you choose, and every gadget you pick becomes a piece of your unique storytelling puzzle. Remember, this is your stage, your canvas, and your chance to let your personality shine through!
So, grab those tools, unleash your imagination, and turn that ordinary room into an extraordinary video space that reflects you. There’s no one-size-fits-all here—embrace the quirks and the little things that make your studio uniquely yours.
Now, get out there and let those creative juices flow! Whether you’re showcasing your talents, sharing knowledge, or just having a blast, your revamped setup is the launchpad for your adventures. Can’t wait to see what you create next! Happy filming!